Adjusting your Account Settings
Each user can customize their BlueMind interface. In particular, he can choose the language or create delegations.
To do this, open preferences from the navigation bar at the top of all BlueMind pages:

Some modifications are automatically taken into account and saved on the fly, with an information banner appearing at the bottom of the page:

When user action is required, save and cancel buttons appear at the bottom of the page:

If the user clicks on the close cross to quit preference management, confirmation is requested if any changes have not been saved :

Setting general preferences
Setting localization preferences
The Localization section lets you adjust the app's general localization and display settings:

-
The interface language
-
The date display format:
dd/mm/yyyyoryyyy/mm/ddormm/dd/yyyy -
The time display format: in 24-hour
13:00or in Anglo-Saxon format1:00 pm -
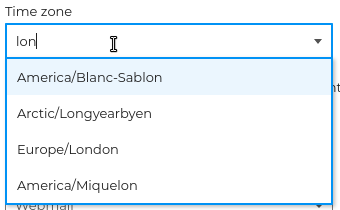
The time zone: select the text and erase it to see all available time zones, or type the first letters of the country or city to search for a time zone:
Consistency with the environment
When the chosen time zone is different from that of the system, a link makes it easy to bring it into line:
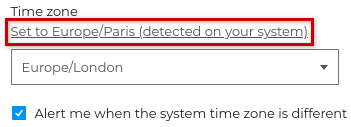
The " Alert me when system time zone differs " option lets you be notified when the chosen time zone differs from that of the workstation:

💡 Unchecking this option allows you to use a different time zone without being alerted every time you reconnect.
BlueMind is currently translated and being translated into several languages. The available languages and their evolution can be consulted on the site dedicated to the application's translation: https://forge.blue-mind.net/translate/
Setting the default startup app
Also in general preferences, Default Application allows to choose the application that will open when connecting to BlueMind: Mail or Calendar.

Choosing theme
The theme allows you to display the mailbox in light mode or in dark mode. By checking the System theme option, the display adapts to the mode defined in the computer settings.

The dark theme is currently only available for the Mail application. For further information, see, Customizing Mail.
Creating Tags
Tags are keywords that can be added to contacts or events to help organize and find them quickly.
Domain tags, created by the administrator, appear automatically :

To add a personal category, go to "+ Create a category" then
- enter a name
- choose a color (by default, an available color is suggested)
- click Create
Personal tags appear under "My tags" :

Click ![]() to edit and
to edit and ![]() to delete a tag.
to delete a tag.
Domain tags cannot be modified.
Managing security settings
The "Security" section lets you manage your password and generate API keys:

Changing your password
To change password :
- click on Edit to open the pop-up window:

- enter the new password in the "New password" and "Confirm new password" fields
- click Save
A password policy can be defined by administrators, the interface then alerts you when the new password does not comply with the requirements:

Generating an API key
API keys can be used to connect to a user account without using the account login password. In particular, they enable you to connect an external service without having to provide it with the user password, and to revoke access at any time by deleting the key.
To create a key :
- click on the + Generate API key button to open the pop-up window:

- enter a name to identify the use of the key (for example, the name of the service or site for which it will be used)
- click on "Create"
The key is immediately created and added to the user's key list. Each user can create as many keys as they wish.

Securing connection with OTP
OTP stands for "One Time Password". This is a randomly generated 6-digit number that strengthens authentication and complements the user's password. This number is valid only once for 30 seconds, after which a new number is generated.
Authentication security must first be activated by an administrator. For further information, see Multi-factor authentication via OTP.
OTP configuration
When OTP security is requested, the following screen is displayed after the login details have been entered:
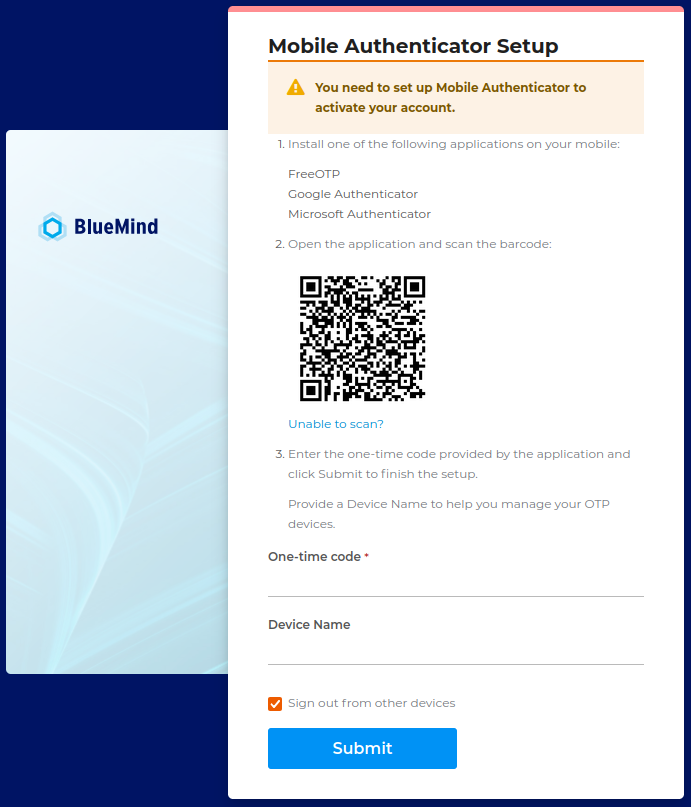
- The 1st point presents the compatible secure applications, which the user is free to choose from.
- Once the application is installed, use it to scan the QR Code displayed on the screen.
💡 If the proposed QR Code cannot be scanned (no device available, use on the mobile itself, etc.), click "Unable to scan? :
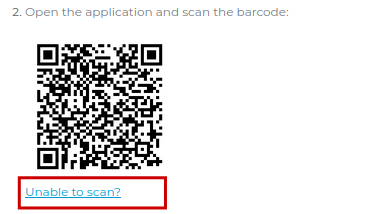
An identification key is then proposed, which must be copied/pasted or recopied into the chosen application:
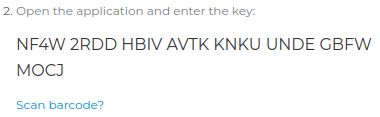
💡 To return to the QR Code, click "Scan bar code? "
The screen also adds a point giving the security rules to be respected or set in the application if necessary, namely:- Type : Time-based
- Algorithm: SHA1
- Numbers: 6
- Interval: 30
- In return, the application supplies a single-use code; enter this code in the appropriate field:

- Name the device then click on "Submit" to validate the connection.
💡 Device name
The "Device name" field is free, and is used to identify the device in question if the user connects to BlueMind from several devices and therefore needs to manage several keys.
Login with OTP
The next time you log in, once you've entered your username and password, BlueMind simply asks for a one-time code:

To log in:
- Open the application selected during configuration
- Generate code for configured server
- Teach the code generated by the application
- Click "Connect"
Managing delegations
The Delegations section allows to appoint delegates and define the level of their rights.

A delegate is a user in the domain that has the right to act on behalf of the delegator user. Depending on the options chosen, the delegate:
Note that delegations only concern the default mailbox and calendar (My mailbox, My calendar). It is not possible to create delegations for user-created e-mail addresses or secondary calendars.
To make it easier to manage the sharing of default applications (My Mailbox, My Calendar, My Contacts, My Tasks), users can also modify access levels, for each delegate, from this section.
Creating a delegation
To add a delegate :
- Click on "+ Create a delegation" to open the pop-up window
- Add a user in the "Delegate" field: type the first letters and choose from the list proposed by autocompletion.
- Set up delegation by selecting the desired options and levels of application access rights.
- Click on "Create"

Setting up a delegation
1. Define the level of delegation
A delegation allows a delegated user to send emails using the delegating user's email address. The first parameter to set is the desired level of customization. Depending on the option selected, the recipient may or may not see that the email has been sent by a delegate.
⇒ Minimum option: The delegate can write on my behalf
The "Written by me" option is checked automatically, is the minimum right to create a delegation**.
With this option, when the delegate sends a message with the delegating user's e-mail address, the recipient sees that the message has been sent by the delegate:

See the documentation Writing on behalf of another user for more details on using this option.
⇒ Maximum option: The delegate can write as me
The "Write as me" option completely impersonates the sent emails.
This option allows the delegate to send messages with the delegating user's e-mail address without the recipient seeing it:

See the documentation Write as another user for more details on using this option.
No messaging sharing level is required for a delegate to write on behalf or in the name of a delegator. However, it is advisable to give him at least read rights, so that he can see and reply to messages received by the delegator.
2. Grant invitation management rights
After selecting the delegation level, it is possible to allow the delegate to manage invitations received by the delegator from their Mail app.
To do this, select at least the "Can edit my appointments" Agenda sharing level and check the desired option(s):

⇒ Minimum option: The delegate receives and responds to my invitations
For the delegate to manage invitations from their messaging, tick the option "Receives invitations-related messages and replies to them".
In addition to the default calendar write rights - allowing events to be managed from the Calendar - the delegate receives all notifications related to the delegator's public events on his/her mailbox and can respond, "from" or "as" the delegator - depending on the delegation option chosen.
This option does not require the delegate to have read rights to the delegator's mailbox.
See the documentation Delegate managing invitations for more details on using this option.
⇒ Maximum option: The delegate can see my private events
An additional right can be granted to the delegate to see and manage private events from the Calendar. To do this, also tick the option "Can view private events in the Calendar".
When this option is ticked, the delegate can see the details of the private event and can respond to the invitation in the Calendar.
Whatever the chosen delegation level, a delegate never receives notifications of private events in their mailbox. Managing private events by a delegate can only be done from the Calendar.
Refer to the documentation Responding to an event invitation for more information on managing events from the Calendar.
⇒ Additional parameter: the delegator chooses whether or not to manage his invitations
As soon as at least one delegate is created with the "Receives and responds to invitation messages" option, an additional setting is displayed under the delegation summary table, allowing the delegate to choose whether or not he/she also wishes to manage his/her invitations:

- I do not receive messages: only the delegate receives the notification and manages the invitation, the delegator does not receive either the invitation or the responses sent by the delegate
- I receive a copy: both the delegate and the delegator receive the invitation, but only the delegate can manage the invitation; the delegator receives a read-only copy of the invitation and can see the delegate's response in the date icon:

- I also receive messages: the delegate and the delegator receive the invitation and can manage the invitation - this setting is selected by default
Refer to the documentation Managing invitations for more details on managing invitations from Messaging.
3. Manage access to my default applications
The delegation creation window also allows you to view and set default application sharing levels (My mailbox, My contacts, My calendar, My tasks) assigned to the delegate.
When a delegate is selected, the sharing rights previously assigned in the share management for each application are automatically displayed.
If no rights have been defined, the default rights are :
- Calendar: "Can change my appointments
- Tasks: "Can modify my tasks".
- Mail: "Has no rights"
- Contacts : "Has no rights
When a right is modified here, the modification is immediately taken into account in the application's share management (refresh the page if necessary).
Once the delegation is created, the delegate receives an email notification summarizing the rights granted to them :

Managing delegations
Once delegations have been created, a table summarizes all the delegations and rights granted to each delegate :

- The
 icon indicates that the delegate Write as me
 - The
 icon indicates that the delegate Receives and responds to my invitations
 - The
 icon indicates that the delegate Can see my private events
Click on ![]() to modify a delegation and
to modify a delegation and ![]() to delete it.
to delete it.
Managing external accounts
BlueMind connects with a number of services to make it easier for users to exchange and use their data (attach files from a Nextcloud, Interstis or Alfresco drive, launch calls with Xivo or Wazo, connect to Teams meetings, etc.).
Create an external account
To configure the connection to an external account, go to Preferences > My account > External accounts:
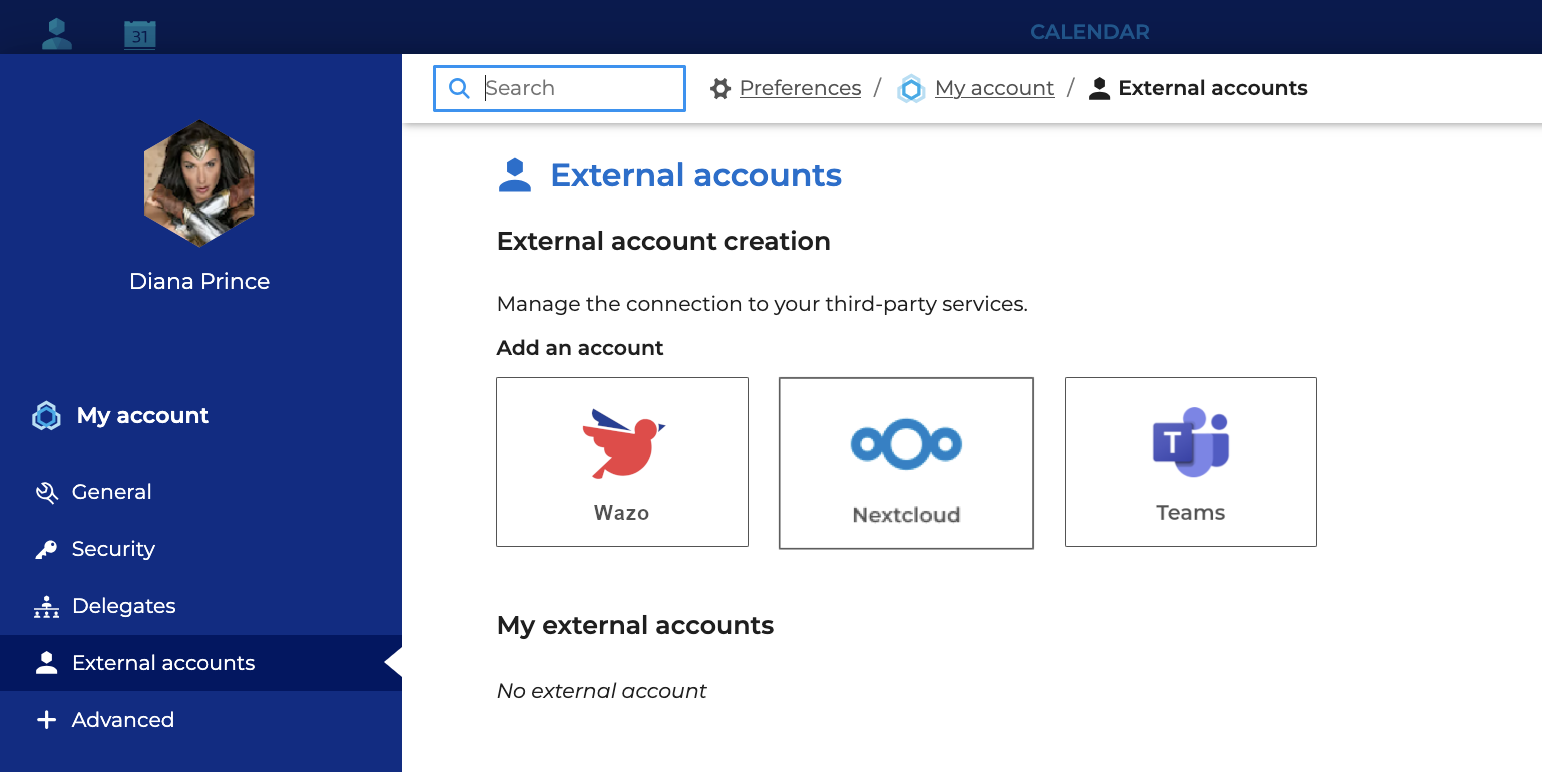
If a service does not appear, contact an administrator: only installed and activated services are visible.
Click the desired service and Fill in the required information :
- Alfresco
- Interstis
- Nextcloud
- Teams
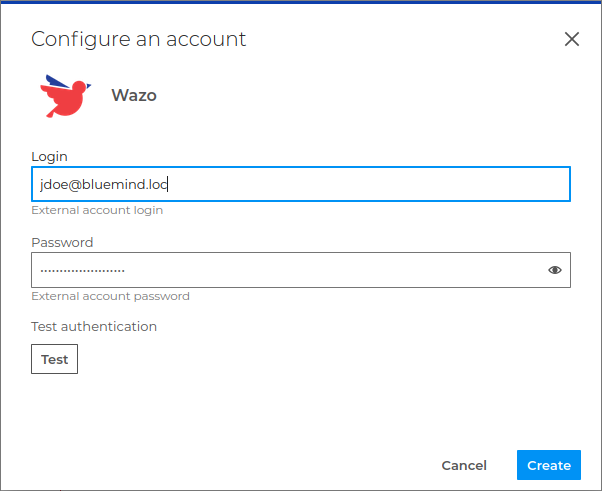
- Wazo
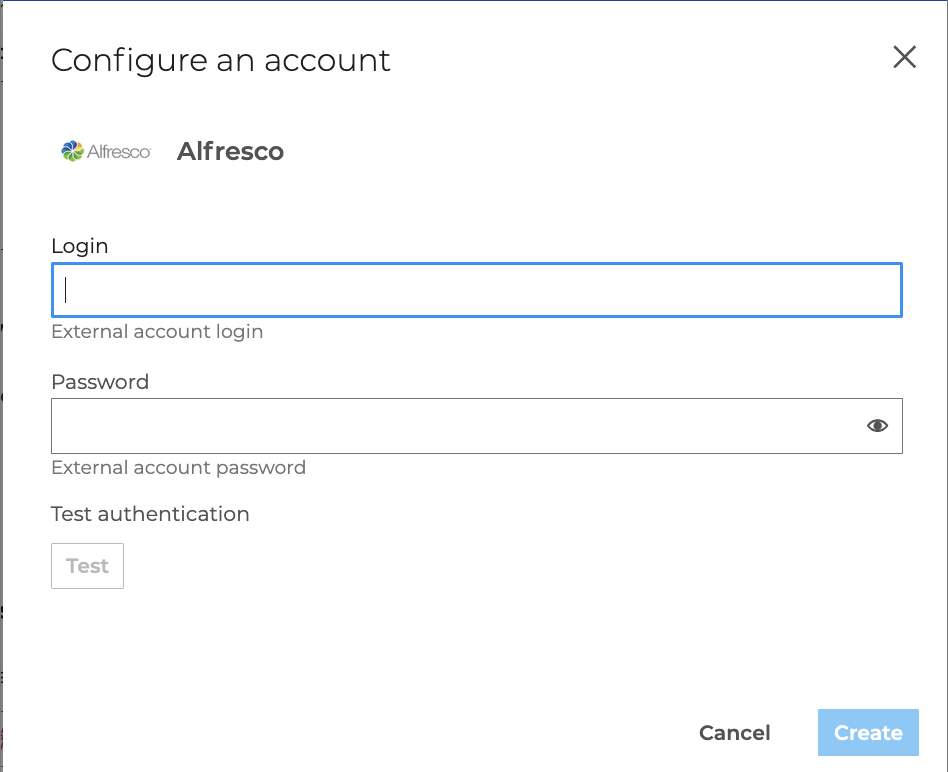
- Enter your username and password,

- Enter your username and password,

-
Enter the username and password,
LDAP SynchronizationWhen Nextcloud is connected to an LDAP directory, the WebDAV URL is no longer formed using the user’s username but with the account’s UUID; it takes the form
https://<serveur_nextcloud>/remote.php/dav/files/<UUID>.
It is therefore necessary to specify the WebDAV URL, which can be found in the Files settings of the user’s Nextcloud space: in Nextcloud, go to the Files app and navigate to Files Settings > WebDAV: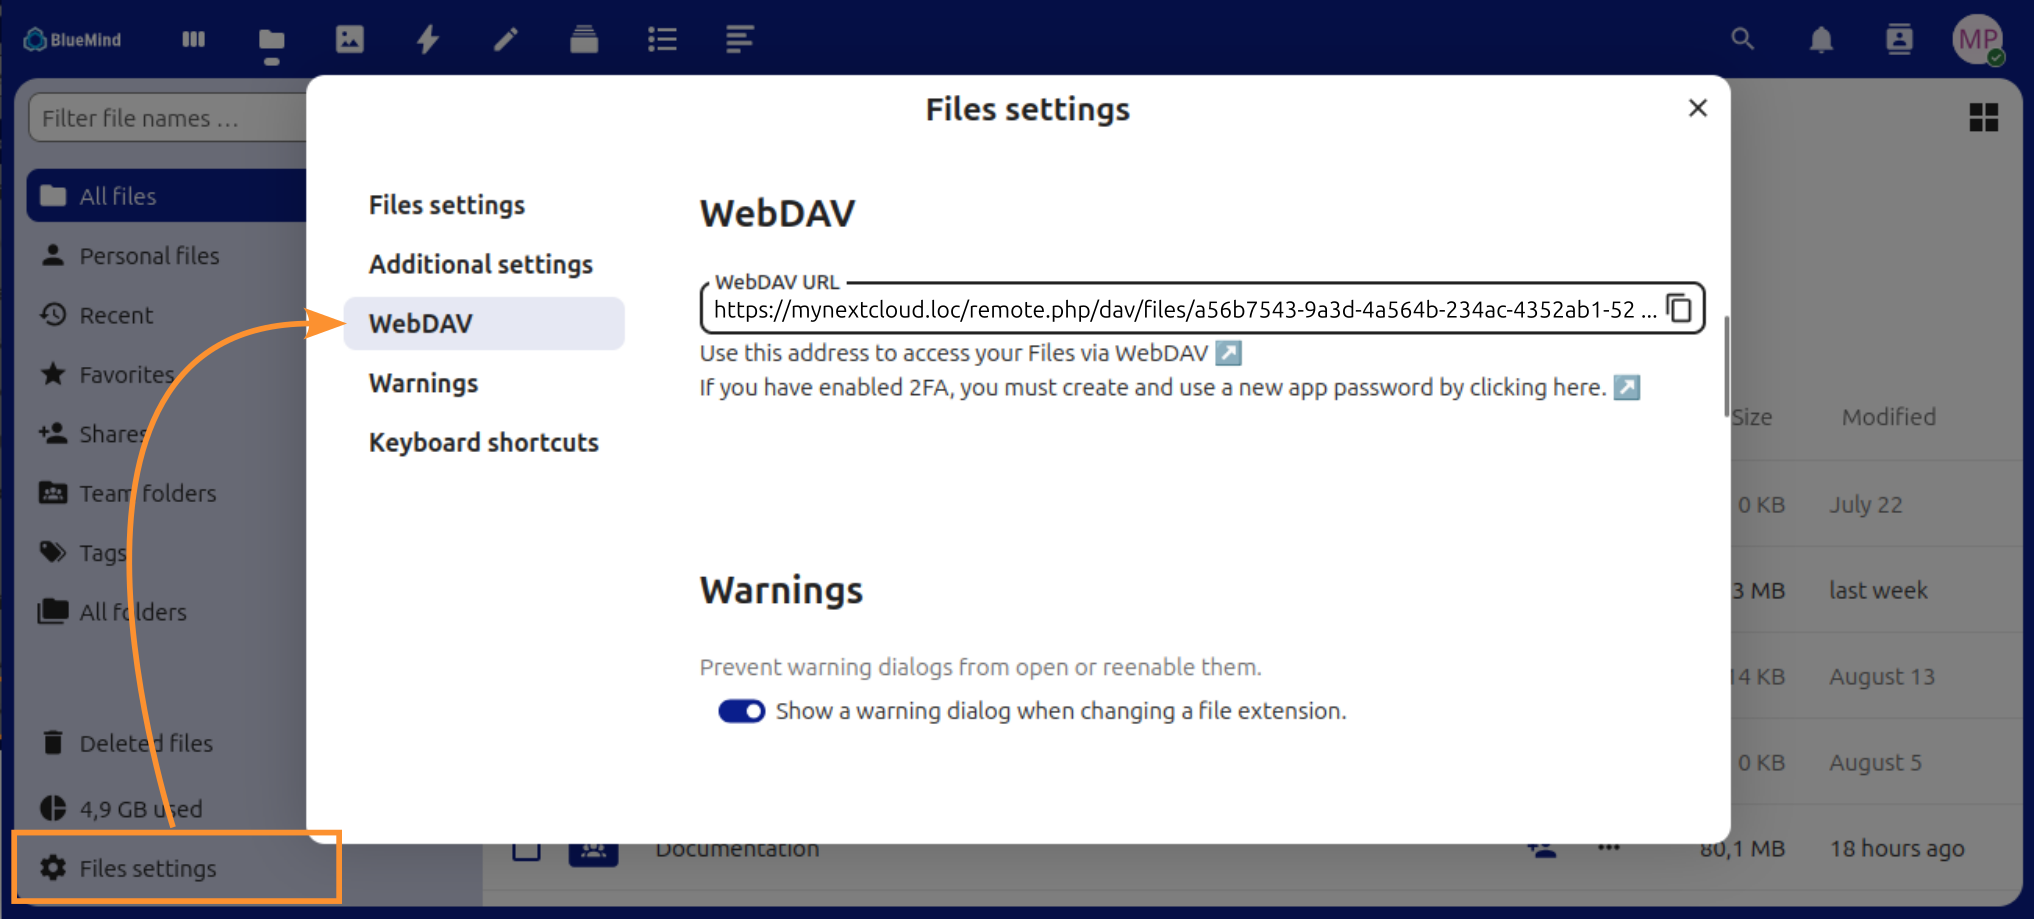
💡 If you are unsure whether this synchronization is enabled, you can configure the URL without risking any disruption to normal operation.
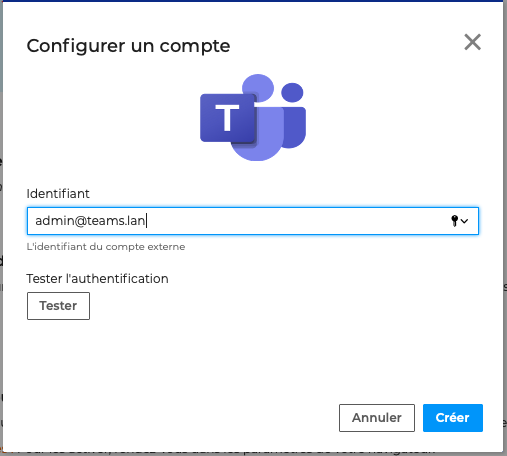
- Enter your username (email address used in Teams),
- Enter your username and password,
- Click Test to validate the parameters,
- If the test is successful, click Create.
Modify/delete an external account
Existing accounts are listed under the logos of the available services:
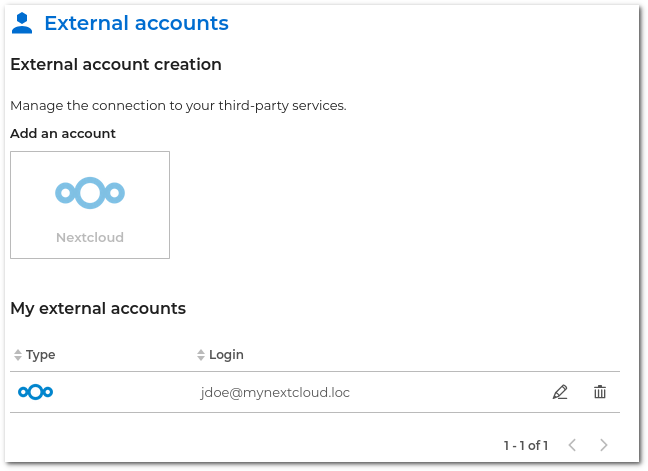
- Click
 to modify an account's configuration.
 - Click
 to remove the connection to an external account.
Managing advanced settings
The "+ Advanced" section of the user account preferences gives access to the application's reset local data and enable notifications:

Resetting local data
When using the BlueMind solution, the browser saves session-related data, such as user preferences, contacts used, etc. Thanks to these records, the server automatically recovers regularly used data, which allows BlueMind to provide an optimal experience of its applications.
Occasionally, however, there may be inconsistencies in the local data, which can lead to display problems.

In this case, we recommend you contact the administrator. If necessary, local data can be purged and resynchronized by clicking on "Reset".
Enable notifications
When notifications are enabled, an alert will be displayed on your screen when you get a new message or have an event reminder. To allow the browser to send these alerts, click on "Enable notifications".
This feature is supported by all BlueMind-compatible browsers. For further information, see the page Compatibility.
Download a connector
The Downloads section allows users to download the Thunderbird connector provided by BlueMind to synchronize their software.

For more information, consult the Thunderbird configuration 115 page.
Find out more
Watch related BlueMind videos
Manage app settings:
- Calendar:
- Mail:
- Contacts:
- Tasks :