Corporate Signatures
BlueMind's Signature application allows you to set automatic signatures for all or some users based on certain criteria.
It also allows for the implementation of a disclaimer message, generally known by the English term disclaimer: this message, which is added to all messages unconditionally, in addition to the signature, allows for adding information (commercial, legal, ecological, etc.) to all electronic messages sent by users of the domain.
Corporate signatures are not S/MIME compatible. Neither signatures nor disclaimers will be added to signed or encrypted emails.
Installing the application
Application installation
To install the new Signature application, install the necessary packages on the BlueMind server and restart BlueMind:
- Debian/Ubuntu
- RedHat
aptitude install bm-plugin-core-signature bm-signature bm-plugin-hps-signature
bmctl restart
yum install bm-plugin-core-signature bm-signature bm-plugin-hps-signature
bmctl restart
Application access
Signatures are managed from a dedicated BlueMind application, not directly from the administration console. As a result, the super administrator admin0 must appoint users or administrators who can access (or delegate access to) the application to manage domain signatures.
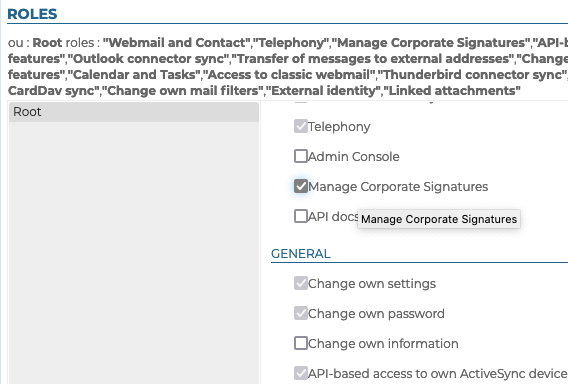
Users or groups of users can be assigned the role "Manage corporate signature" the same way as any other role (see Users - Roles):
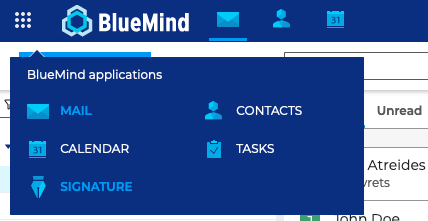
Once the role has been assigned, and after logging in again if necessary, the user has access to the application in the same way as to other BlueMind applications, from his or her main banner:
Using the application

The main view of the application is divided into 3 parts:
- at the top of the page, the main action buttons for creating, ordering and testing signatures
- the list of signatures presented with their main characteristics:
- their label
- their status: activated, deactivated, programmed
- the senders they apply to
- the recipients concerned
- edit/delete buttons
- the disclaimer: it has the same characteristics as signatures but it cannot be deleted. A disclaimer is included by default in the application when it is installed, but it remains empty and inactive until it is configured.
Creating signatures
To add a signature, click  in the top left corner of the page:
The creation/edition form is then displayed:
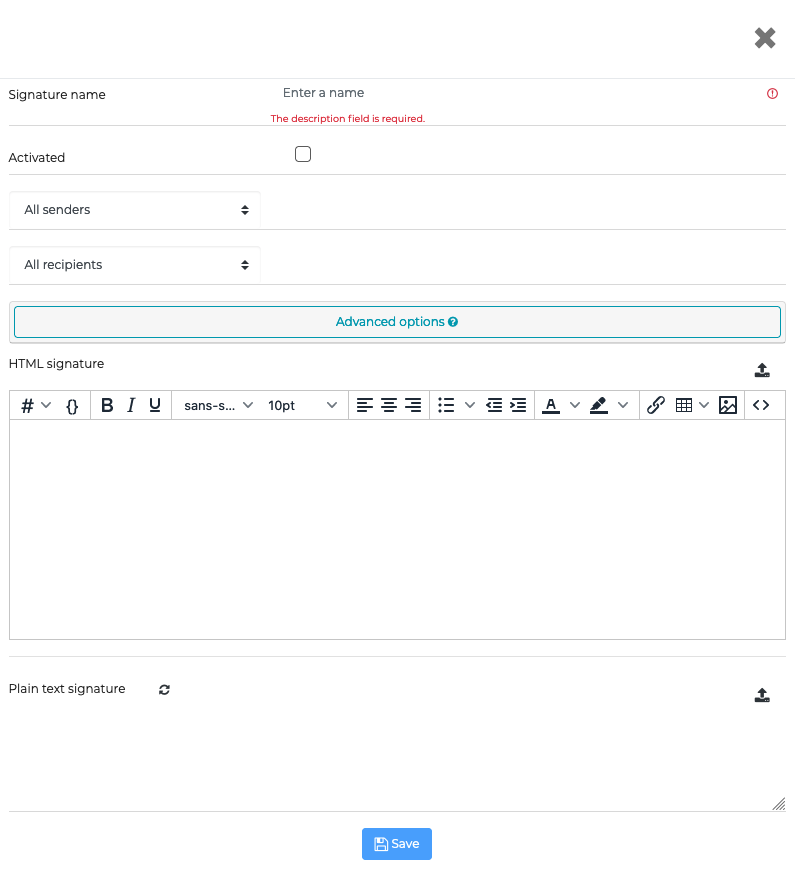
- Signature name: used to identify the signature in the list. This field is mandatory.
- Activated: check this box to enable or disable the signature.
- Senders: the signature will be applied to all outgoing messages sent by the users selected:
- All senders: all users in the BlueMind domain.
- Sender is: a text box is added. Using autocomplete, enter the name of one or several entities – users or shared mailboxes.
- The sender is a member of: an input field is added, then fill in with the help of autocompletion one or more groups. The signature will be added to the messages sent by users who belong to one or more of these groups. Example: a specific signature for members of the "support" group responding to help requests, a common signature for members of the "sales" and "communication" groups responding to customer requests.
- The sender is not a member of: an input field is added, then fill in with the help of autocompletion one or more groups. The signature will be added to the messages sent by users who do not belong to these groups. Example: one signature for all non-management users, one signature for all non-technical users, i.e. not belonging to the "support" or "development" groups.
- Recipients: the signature will be applied to all the messages sent to a type of recipients:
- All recipients: will apply to all messages.
- Internal recipients only: will only be added to messages sent to domain users.
- At least one external recipient: will be added to messages sent (To or Cc) to at least one recipient outside the domain.
Who will see the signature?
The signature is added to the message body, therefore all message recipients will see it.
This means that only one of the sender/recipient pairs needs to meet the signature application conditions for the signature to be visible to all recipients.
For example, a signature is created with the following criteria:
- Sender: is a member of "trade"
- Recipients: external
Sales manager Christiane (christiane@bluemind.loc) writes an email to several recipients:
- To:
- Client: client@domaine.swe
- Employee: bernard@bluemind.loc
- Copy:
- Accountant: peter@bluemind.loc
==> the sender is a member of the commerce group and the customer has an external address ==> the signature is added to the message, all the message recipients see it: the customer, Bernard and Jean-Claude.
-
Advanced options : clicking on this area opens a box giving access to additional options:
-
Signature validity period : period during which the signature will be activated, enabling signatures to be scheduled in advance and/or made temporary:
- Permanent : the signature applies as long as it is activated
- From : the signature will apply from the date indicated inclusive until deactivation
- Until : the signature will apply from its activation until the date indicated inclusive
- Period : the signature will apply from the first date indicated until the second. These dates are included in the application period.
-
Allow user to place signature : allows the user to choose where to place the signature (before or after the message to which they are replying).
noteIn the old BlueMind webmail and in third-party client software (Thunderbird, mobiles, etc.), users can place the following markers in the message they are writing:
-=+=-=+=-before the signature and+=-=+=-=+after. If a moveable corporate signature is applicable, these two markers and their content will be replaced by the signature. For ease of use, users can place these markers directly in their personal signature.
-
-
Remove all previous occurrences: when users reply to a thread of messages, earlier occurrences of their signature are deleted.
-
HTML signature: signature that will be added to the messages sent in HTML format.
-
The WYSIWYG editor allows you to create a signature or import one by copying/pasting one from another source (web creation software, another HTML page or an email message, etc.)
- the
 button is used to toggle to HTML editing
 - the dropdown menu
 allows you to insert variables (see box below)
 - The
 icon at the end of the row is used to import HTML code from a file (text file, HTML page, etc.).
tipWhen importing an HTML file, the text signature is automatically generated if empty.
- the
-
-
Plain text signature: a simple signature added to messages sent in plain text format.
- The
 icon allows you to generate a plain text signature from the HTML signature.
 - The icon at the end of the row is used to import text from a file.
- The
Click  to save the signature and leave the window.
If you leave the window without saving (using the "x" in the right-hand corner or by clicking outside it), a confirmation dialog will ask you whether you want to leave without saving or return to the window.
Placeholders
Placeholders can be used to customize signatures depending on the sender - e.g. the signature's appearance is the same for all but shows the specific sender's name, telephone number and address.
There are two ways of adding placeholders:
- When you start typing the corresponding code with
#{, autocomplete will suggest possible variables as you type:
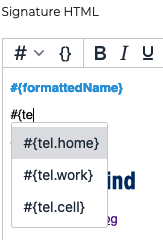
- use the drop-down list to select one:
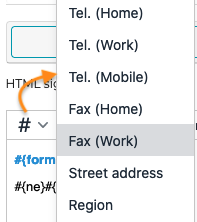
Placeholders match the information in users' contact details cards (as entered by your administrator or through AD/LDAP synchronization). This information can be found on the contact form when consulting the domain directory:
#{formattedName}: full name, composed of prefix+first name+other name+last name+suffix#{gender}: gender#{name.prefixes}: prefix#{name.suffixes}: suffix#{name.givenNames}: first name#{name.familyNames}: last name#{name.additionalNames}: other name#{email}: email address#{impp}: instant messaging
Note: when multiple instant messaging fields are filled out on the user profile, the first one on the list will be used.#{tel.home}: home phone#{tel.work}: work phone#{tel.cell}: mobile phone#{streetAddress}: street#{region}: region#{postOfficeBox}: P.O. box#{postalCode}: postcode#{locality}: city#{extendedAddress}: additional address#{countryName}: country#{url}: website#{role}: position/job#{title}: title#{division}: division (in the company#{department}: department (in the company)#{company}: company#{assistant}: assistant's name#{manager}: manager's name#{fax.work}: work fax number#{fax.home}: home fax number
Conditional blocks
If a placeholder is missing in the user's information card, then an empty space is shown.
To avoid this, you can insert a conditional block: if a placeholder is missing in the user's details card, then the entire block will be left out of the signature.
To add a conditional block: select the appropriate text and click  :
:
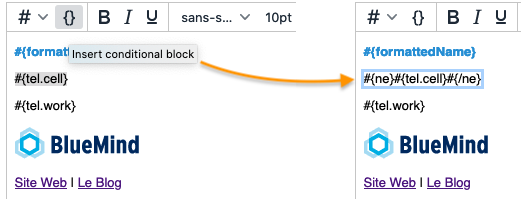
In this example, users with a mobile phone and a landline will have 2 lines showing their numbers, users with only a landline will have one line with their number, and users with no phone will have an empty line (#{tel.work} which is not conditional) between their name and the BlueMind logo.
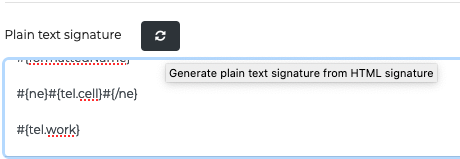
Conditional blocks, like placeholders, can also be used in plain text signatures.
The plain text version generated from the HTML signature will appear like this:
Sorting signatures
Signatures are applied in sorting order. It may therefore be important to sort them in a specific order as when a message matches several signatures' criteria, in that case, the first signature found will be applied.

In this example, the following signatures are set:
- BM all: active
- Documentation: inactive
- Direction: active
If Paul Atréides writes an email, he meets the filter criteria for "Direction" and "BM all" (All senders): as "Direction" comes first in the list, this signature will be used.
If someone in the "Documentation" group wants to write an email, they meet the filter criteria "Documentation" and "BM all": "Documentation" is found first, but it is disabled, therefore the "BM all" will be used.
To sort the list:
- click a signature
- use the
 arrows at the top of the page to move a signature up or down.
Activating signatures
Signatures are only applied when they are activated.
By default, new signatures are deactivated. They will be applied only when they are expressly activated.
To activate a signature:
- Open the signature details page
- Check the "Activated" box:

- Save
The activation statuses shown in the application's homepage are:
 signature disabled
 signature enabled
 signature enabled with a set start/end and currently active
 signature enabled with a set start/end but not currently active (expired or upcoming)
Editing signatures
In the application's homepage, click the  icon at the end of the row for the signature you want to edit to open the signature details page. You can edit it the same way as when you create a signature (see above).
Once the changes have been made, click "Save".
To delete a signature:
- click the
 icon at the end of the row for the signature you want to delete
 - validate the confirmation request
To copy a signature you want to use as a template for a new signature:
- select the signature you want to copy
- click the
 button at the top of the page.
A new signature is immediately created and named "Copy of..." followed by the name of the original signature.
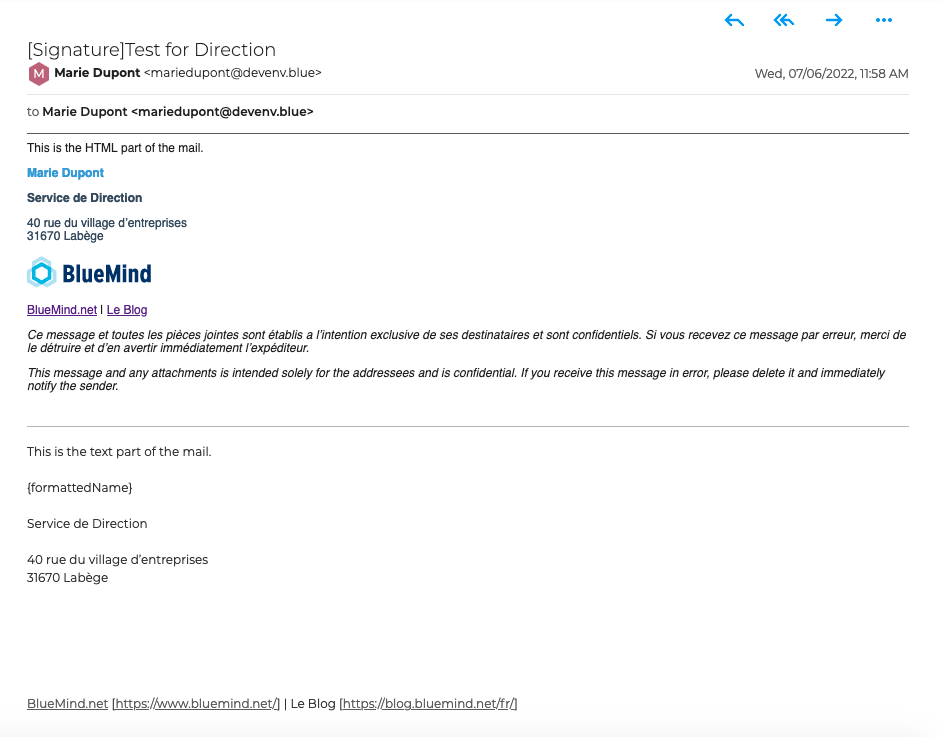
To test the results and see what the signatures actually looks like in a message:
- Select the signature you want to test
- Click
 at the top of the page.
An email is sent to the signature's administrator, in both formats (HTML and plain text), followed by the disclaimer if applicable:
Creating and editing the disclaimer
This message, if enabled, is added to the personal or corporate signature, regardless of the sender.
It may be a legal disclaimer (on confidentiality), a marketing message (company details or special offer) or an environmental warning (a message suggesting not to print the message).
A disclaimer is included by default in the application when it is installed, but it remains empty and inactive until it is configured.
To open the disclaimer editing page, just like for signatures, click the corresponding icon:
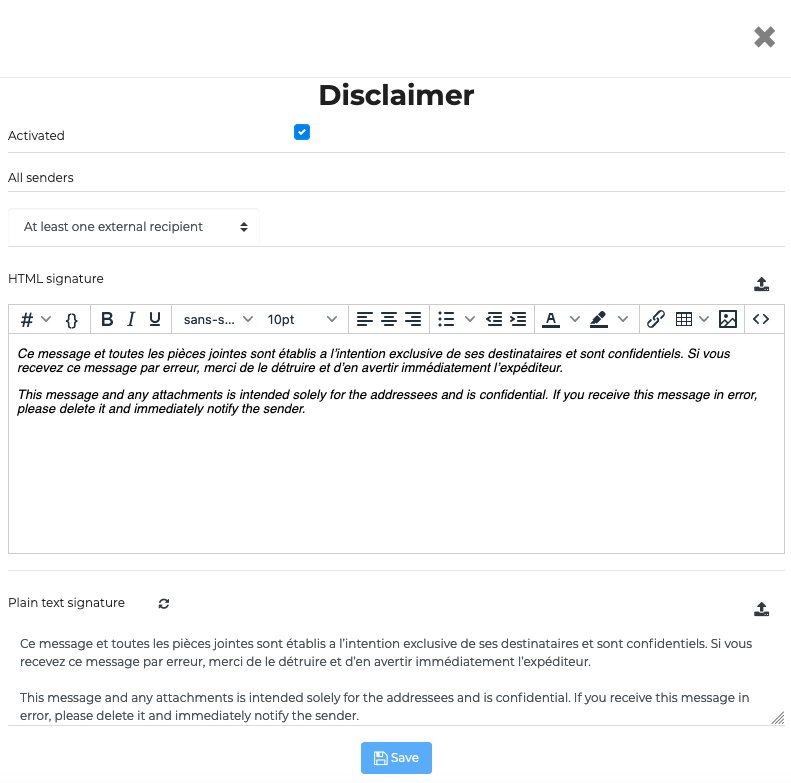
The page is almost identical to the signatures page, with two small differences:
-
the name and senders cannot be edited, it is always called "disclaimer" and applies to all senders
-
there is no validity period, it is applied as long as it is enabled.
-
Recipients: 3 choices are available:
- All recipients
- Internal recipients only
- At least one external recipient
-
HTML signature: HTML code for the signature that will be added to messages sent in HTML format.
-
The same WYSIWYG editor is used as for signatures, you can therefore create a disclaimer in rich text format.
-
Use the
icon at the end of the row to import HTML code from a filetipWhen importing an HTML file, the text signature is automatically generated if empty.
-
-
Plain text signature: simple signature that will be added to messages sent in plain text format. The
icon at the end of the row can also be used to import HTML from a file.
Using corporate signatures
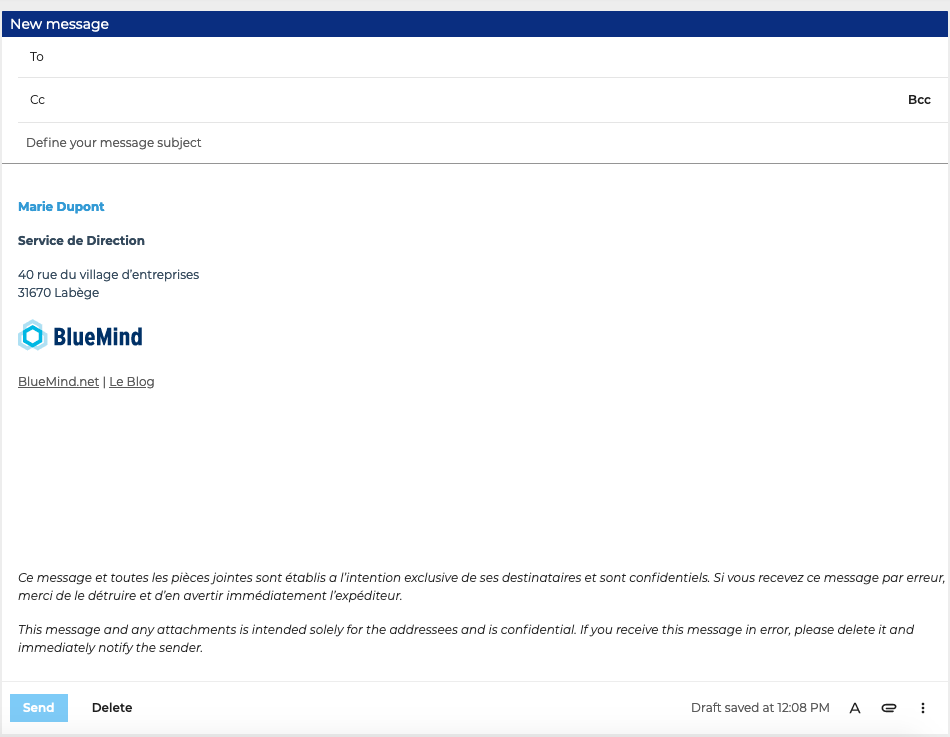
Users can see the signature in their message compose window and can choose where to place it:
To find out more about how signatures work for users, please see our user's guide: