Users
Users are individuals who connect to BlueMind. Users have access to BlueMind features depending on their profile.
Creating a user
To create a new user:
-
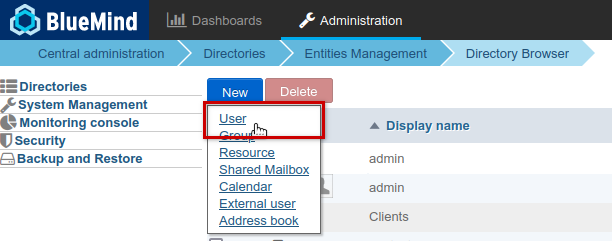
From the Directories home page, click on "Create a user" or from the list of directory entries, use the button New > User:
-
Enter the new user's details in the popup that opens:
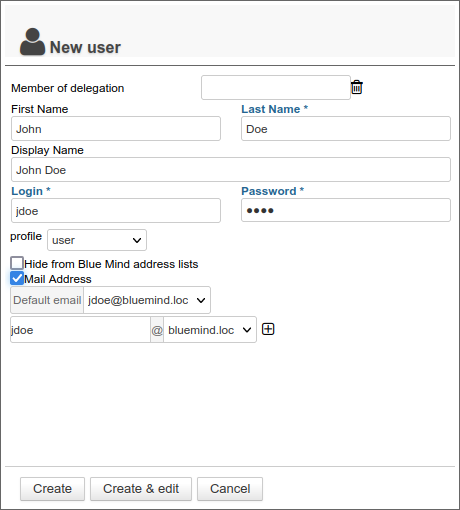
Full name
The full name is generated automatically when you enter your first and last names, and cannot be modified.
-
Select the default group:
userfor users,adminfor administrators, or a default group created by the administrator -
Check the desired options:
-
Hide BlueMind address lists: the user exists but is not visible in autocompletion (webmail dialer or calendar) or in the directory. Its address can still be used by administrators or those who know it.
-
Mail address: the mail account is activated and a default address based on the login is automatically created. To add aliases, click
 at the end of the line.
If the installation includes multiple domain aliases, each additional address can be specified on a specific domain or on all aliases.Maximum number of possible addresses
In BlueMind, you can create as many aliases as you like, on as many domain aliases as you like.
-
-
Click "Create" for a simple and direct user creation or click "Create & Edit" to create the user and access configuration options.
Quick creation
The "Create" button allows a quick creation with the information entered in the popup and the following default options:
- server location (time zone, time format, etc.)
- default storage server, with no disk space quota
- no auto-reply or auto-forward
- empty coordinates
- the calendar can be shared with the option "can invite me to a meeting". This means that other domain users cannot view this user's calendar but are able to invite them to an event
- the mailbox is not shared
The user can then be modified via the administration interface.
Editing and managing users
From the page Directories >> Directory entries, select the user to be edited from the list.
General
Account information
The "General" tab displays the user's main information: account details, profile, group(s), location settings, etc.
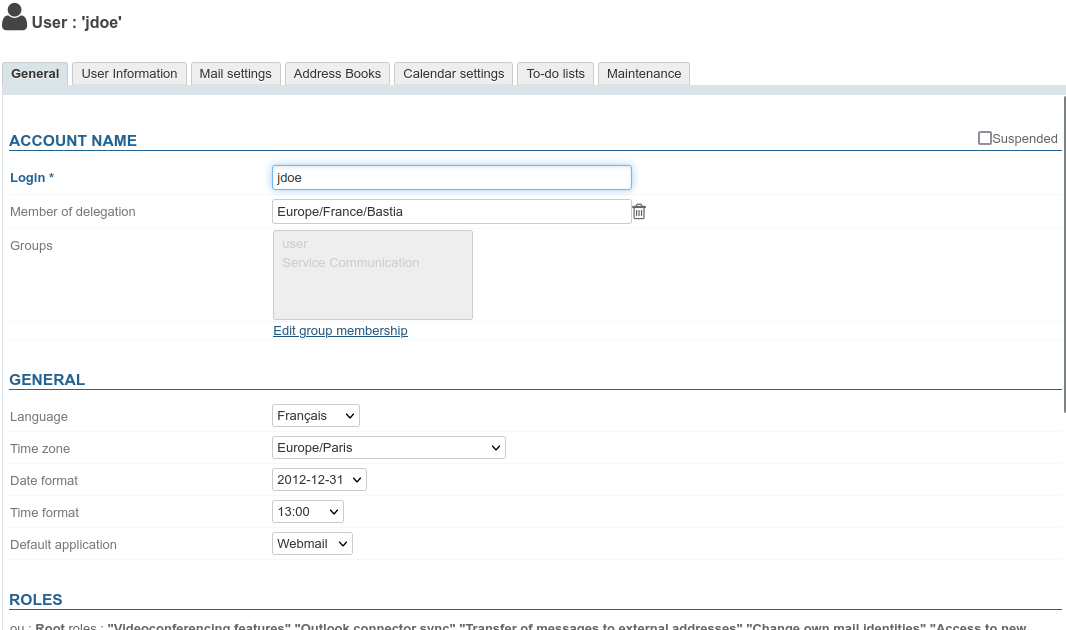
The tab allows, in particular, to define the user as a member of one or more groups or of a delegation and define the roles assigned to the user.
Change username
The account username can be changed on this page. Once a modification has been saved, it takes effect immediately.
If the user whose login is modified works with Outlook connected via MAPI, it is necessary for them to create a new profile with the new information.
The same applies to O365.
For more details, visit the following page: https://learn.microsoft.com/fr-fr/microsoft-365/admin/add-users/change-a-user-name-and-email-address?view=o365-worldwide
Group membership
By clicking on the "Modify group membership" link, a popup window allows you to view and modify the groups to which the user belongs:
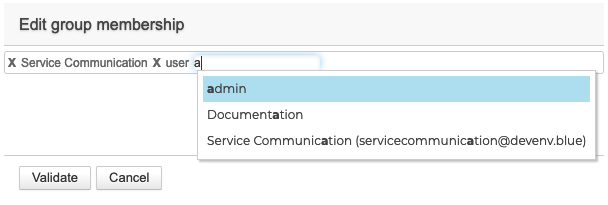
To delete a group, click on the corresponding cross; to add one, enter the first few letters and validate a choice proposed by autocomplete.
Roles: administration rights and access to features
Here it is possible to customize, for each user, access to applications, certain specific features, or even administration rights:
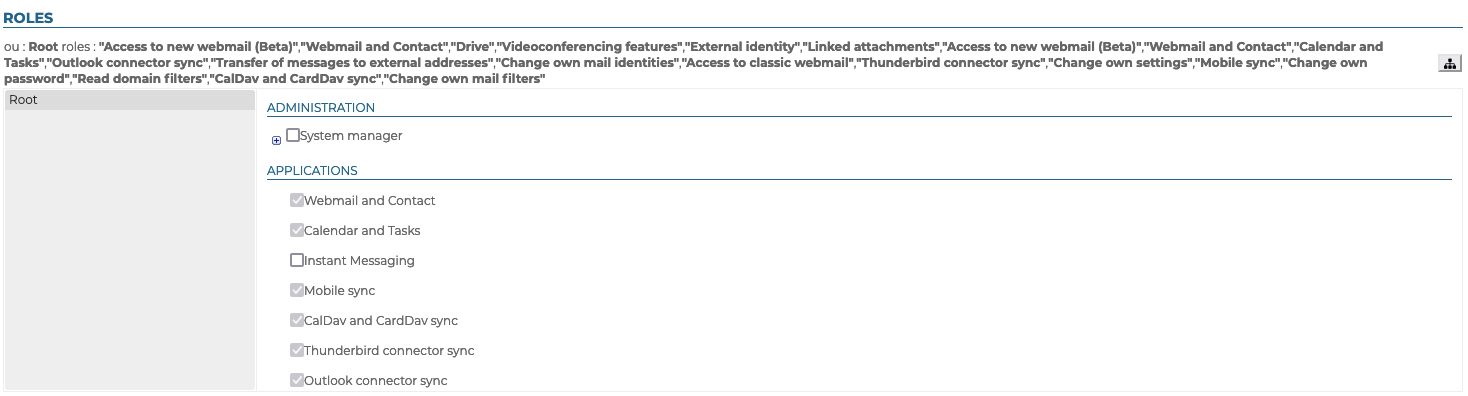
The rights granted can only be added to the rights inherited from a group: the rights assigned to a group the user belongs to cannot be unchecked in the user's page.
For example, applications may appear checked but grayed out, unmodifiable: the user belongs to a group in which the application is activated. In this case, it is advisable to check the user's group membership (see above).
For more details on roles, see Roles: access and administration rights and Delegated administration.
User information
The "User information" tab allows the administrator to enrich a user's contact record.
Here, the administrator can enter information such as telephone numbers and postal addresses, or assign a photo for reuse throughout BlueMind (contact sheet, event invitation, etc.).
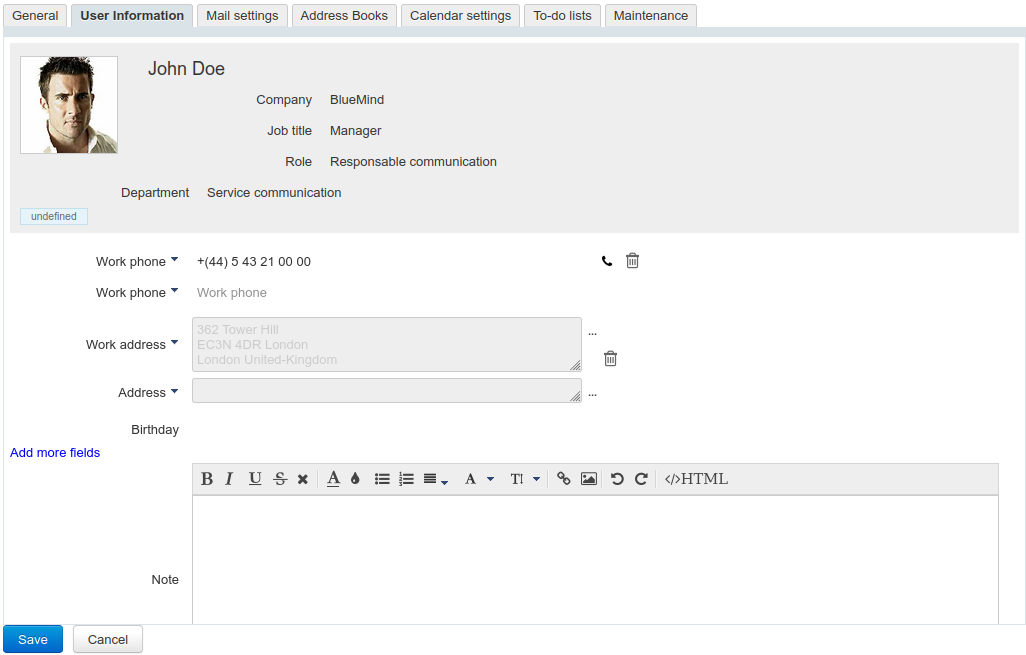
Contact data corresponds to BlueMind's internal directory and is accessible to all users of the solution. For this reason, only administrators can modify this information. The user himself cannot modify his own information.
The "Modify information" role allows the user to manage the information in their file. At present, these modifications can only be made by script via the user's API key, but a management interface via parameters will soon be available.
Mail
The "Mail" tab shows the user's mailbox settings (space, addresses, identities, sharing, etc.):
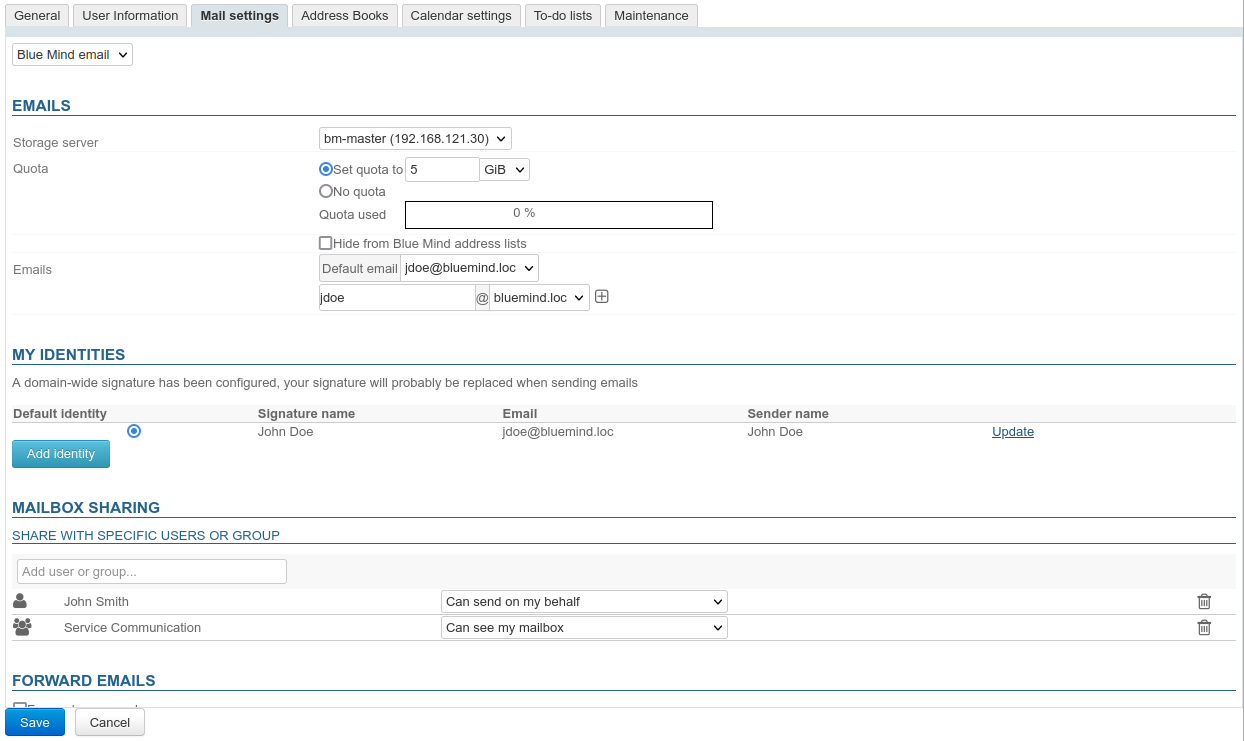
Email addresses
- Storage server: server on which this user is managed.
- Quota : maximum storage size for the user's mailbox and amount used.
The space used by the user is indicated by a progress bar, and is also visible at the bottom of the folder list in the user's mailbox (theme.common.Pourinfo, Managing storage capacity (quota)). -
Hide BlueMind address lists: The user exists but is not visible in autocompletion (webmail dialer or calendar) or in the directory. Its address can still be used by administrators or those who know it.
- Email addresses and aliases: the user can have as many email aliases as desired, on one or all available domain aliases.
Change default e-mail address
The default mail address can be set to any of the mail aliases. This address can be modified as many times as required. Once a modification has been saved, it takes effect immediately.
If the user whose default address is changed works with Outlook connected via MAPI, it is necessary for them to create a new profile with the new information.
The same applies to O365.
For more details, visit the following page: https://learn.microsoft.com/fr-fr/microsoft-365/admin/add-users/change-a-user-name-and-email-address?view=o365-worldwide
My identities
Identities allow users to write under the name of one of their aliases or shared mailboxes, or to define different signatures that they choose according to the emails they write.
To find out more, visit the dedicated page in the user guide: Managing Account Identities.
Mailbox sharing
The share section lets you give other users or groups access to the user's mailbox.
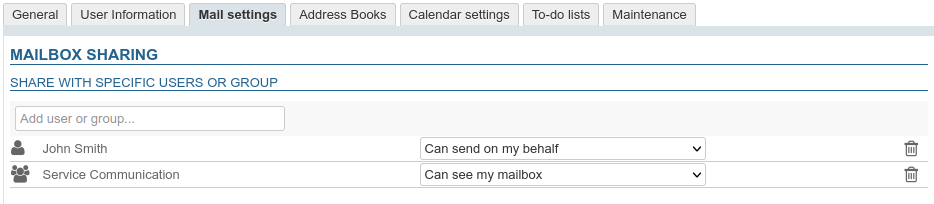
By default, when a user is created, no sharing is activated.
You can define sharing rights for a mailbox:
- by an administrator via the interface here
- by the user, via managing its preferences
For more information on sharing and rights, consult the dedicated page in the user guide: Sharing mailboxes
Automatic message forwarding
It is possible to specify several addresses to which emails can be forwarded.
Check the box and enter a valid email address:

Validate the autocomplete proposal, even if it is identical to the address entered. It is necessary for the blue box with the deletion cross to appear:
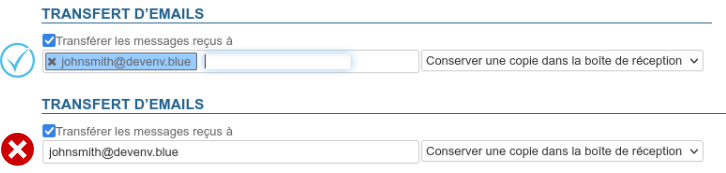
It is possible to manually add external addresses, which will not be added to the address book collected during transfers.
Automatic reply
This section allows you to activate or deactivate the user's answering machine.
To find out more about settings and sending rules, see the dedicated page in the user guide: Managing out of the office
My filters
Filters can be used to apply sorting rules and automatic actions to the user's new incoming emails.

To find out more about how to set up these filters, see the dedicated page in the user guide: Applying sorting and action filters.
Address Books
This tab lets you manage the user's subscriptions to the address books available to him (his personal address books or shared address books), as well as the sharing of his address books with other users or groups.
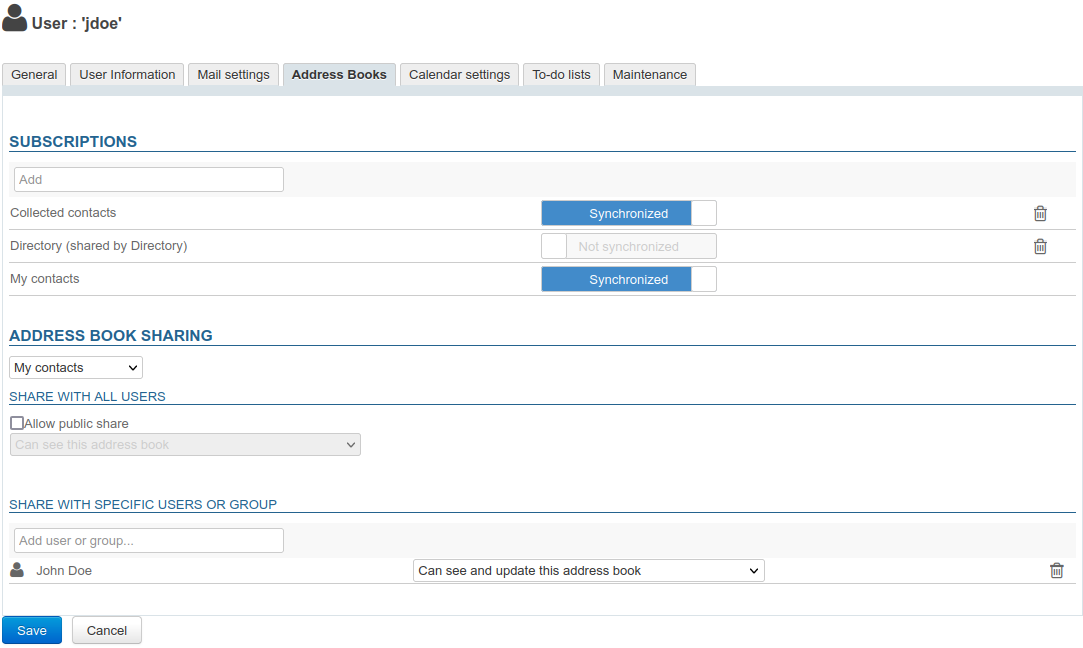
However, it is not possible for the administrator to create user address books.
To find out more, go to the user's guide page: Creating and Editing Personal Address Books and Sharing Address Books
Calendar
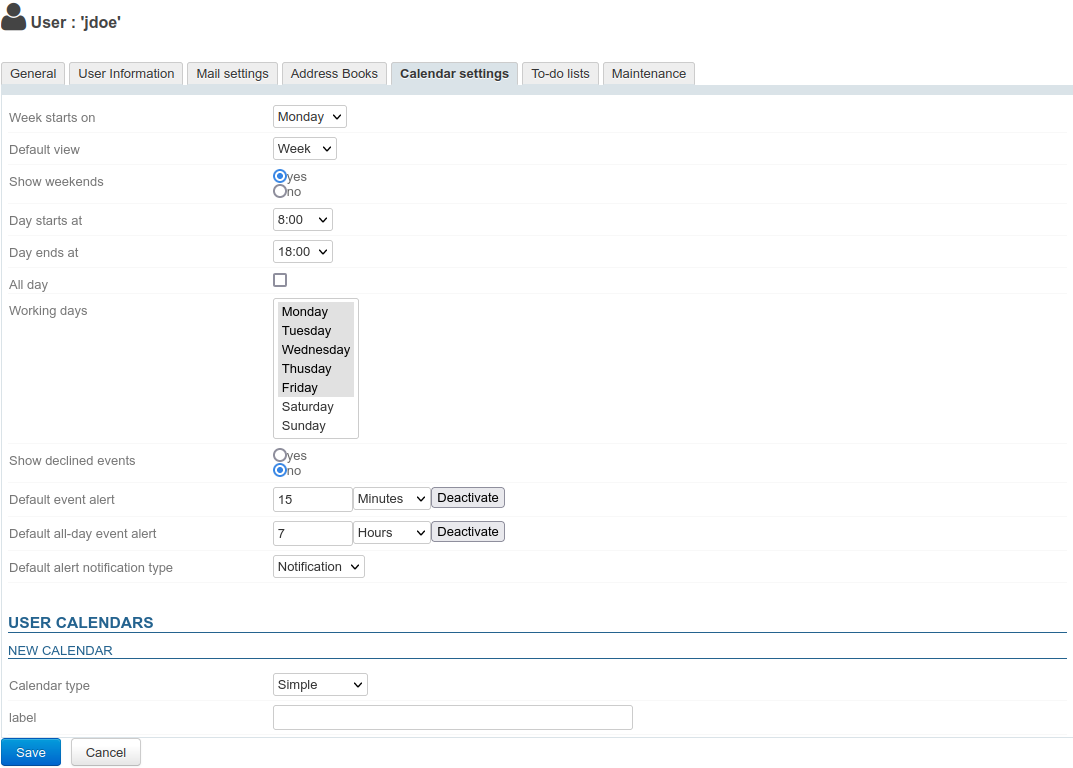
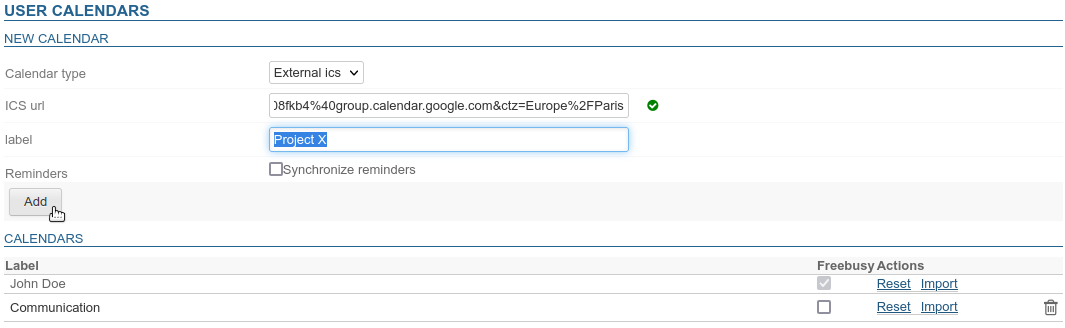
The Calendar tab lets you :
-
to access all calendar settings for the user (schedules, working days, displayed items, etc.):
-
create additional calendars for the user :
-
manage the sharing of user calendars or those he manages:
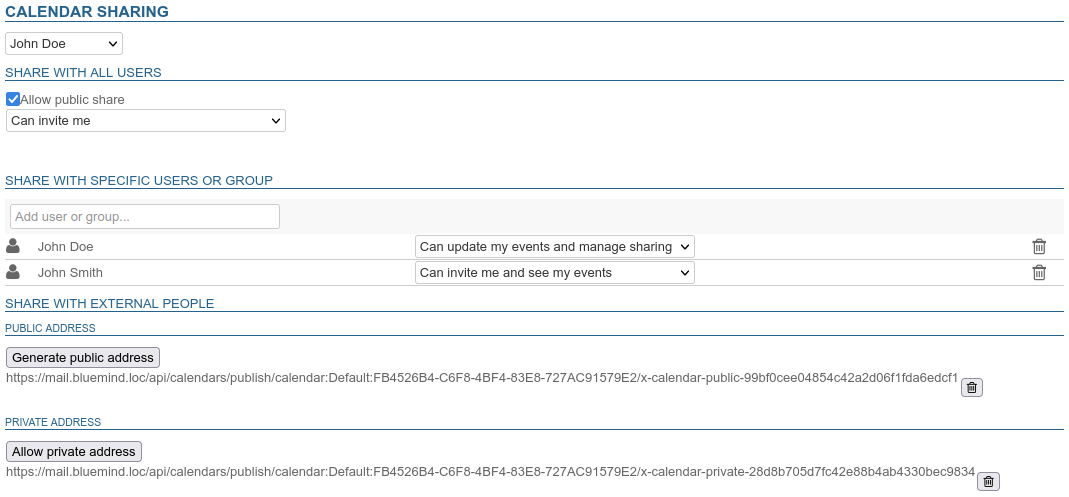
- internally: with all users or specific users and/or groups
- externally: by generating a public or private address
For more details on sharing calendars, see the dedicated page in the user guide Sharing calendars
-
manage the sharing of user availabilities:
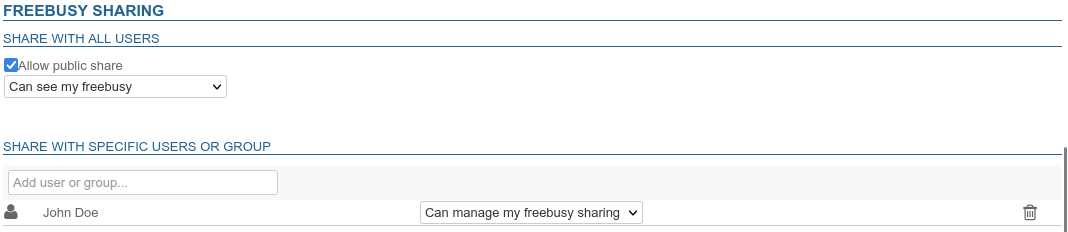
-
manage the sharing of calendars owned or managed by the user:

To-do lists
This tab lets you manage the user's shared to-do lists and subscriptions to shared lists:
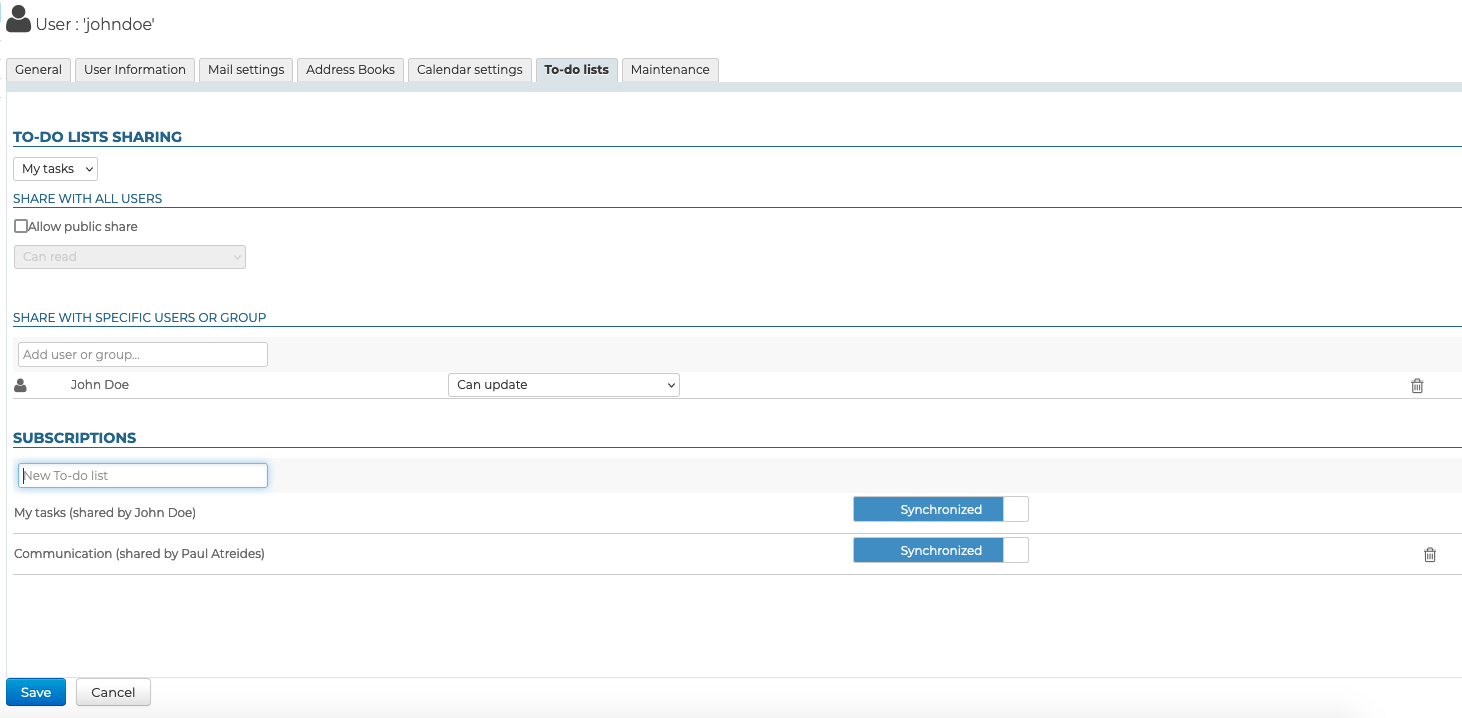
To find out more, go to the user's guide pages on: Sharing To-do Lists and Using Shared To-do Lists.
Maintenance
This tab provides the administrator access to maintenance functions and management of user mobile devices:
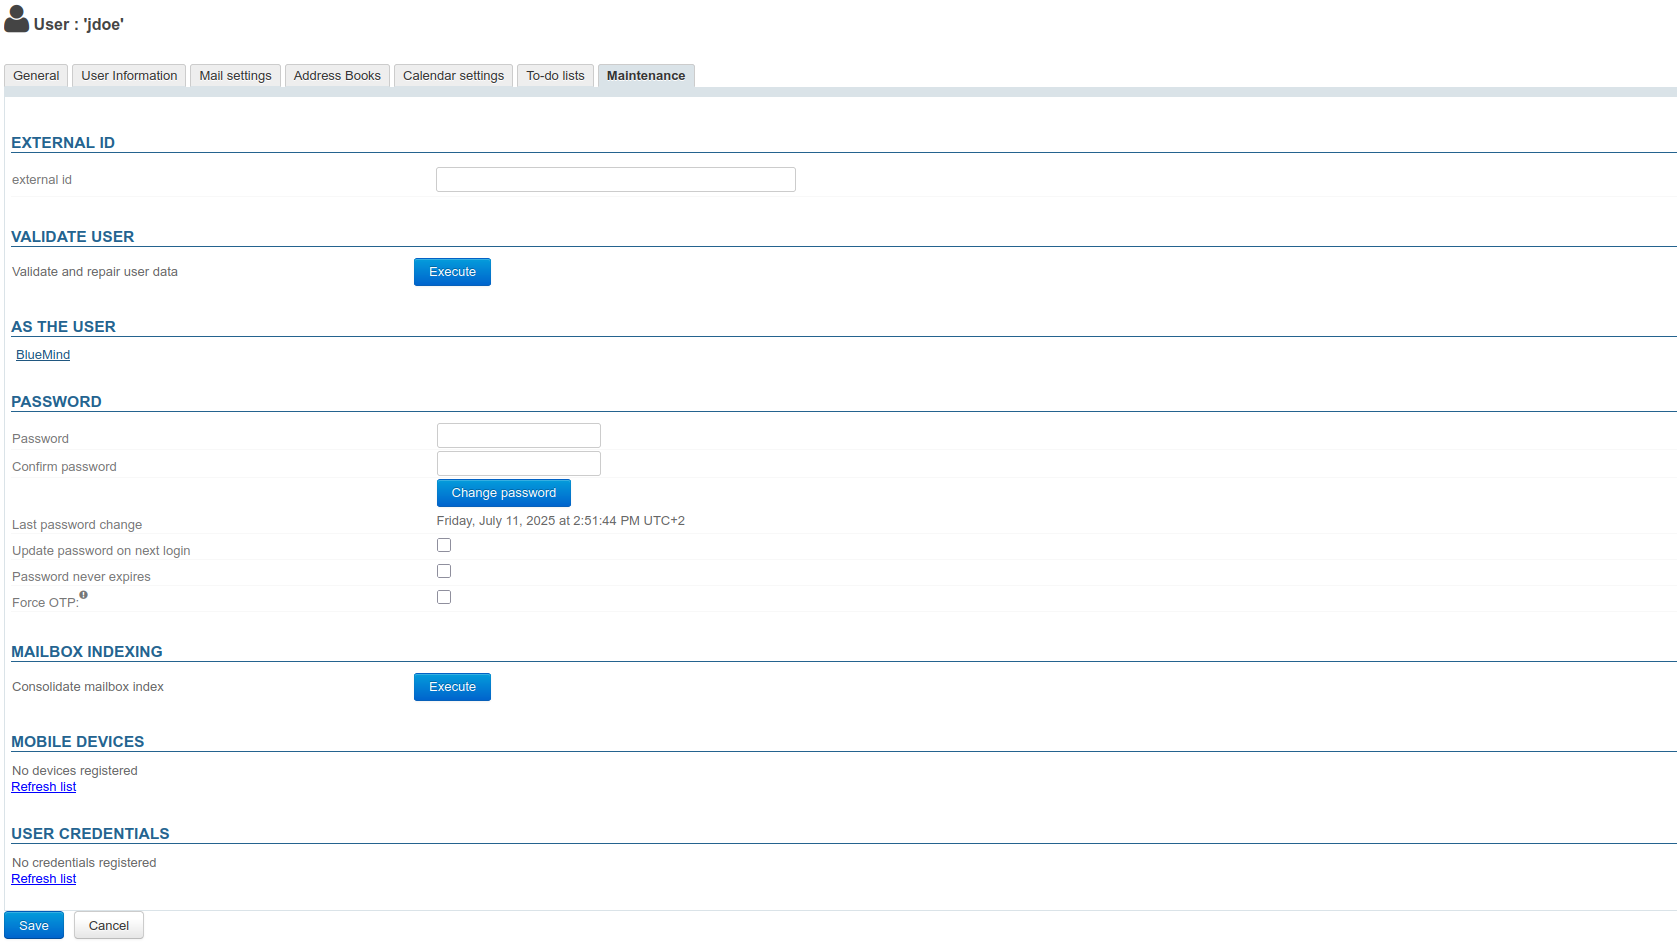
External ID
The field in this section is filled in when the group is synchronized with an AD or LDAP account (theme.common.Pourinfo pages LDAP Synchronization and Active Directory Synchronization).
This field can be filled in or modified in order to force or correct the user's UID corresponding in the AD or LDAP directory.
Validate user
The "Execute" button in this section allows launching a "Validate and Repair" operation on the user's account. This covers a set of operations that check and, if necessary, correct the integrity of the user and his/her data in the BlueMind system: checking mailboxes, calendar and address book containers, folder hierarchies, subscriptions, mail filters, etc.
This operation corresponds to the bm-cli command:
bm-cli maintenance repair user@domain.net
theme.common.Pourinfo the page CLI Admin Client.
As the user
The link in this section is accessible by the super administrator admin0 or another administrator with the "Sudo (elevation of privileges)" role. The link gives access to the user's BlueMind, i.e. logs on to BlueMind in the user's place, without the user having to give his or her password.
Password
In this section, the administrator can change/reset the user's BlueMind login password, without needing to know the user's old password. This section also shows the date the password was last modified (by the user or an administrator), if applicable.
The administrator has 2 additional options:
- Change password at next login: the user will be required to change his password the next time he logs in (this does not log the user out if he is currently logged in).
- Password never expires: this option allows excluding the user from the domain password expiration policy if it has been set up.
- Force OTP: the user will be forced to configure authentication via OTP (One Time Password).
theme.common.Pourinfo hereinafter Multi-factor authentication via OTP.
To activate these options, check the corresponding box(es) and click on the "Save" button at the bottom of the page.
Expiration cannot be applied to users imported from an AD or LDAP directory, as passwords are managed by the latter.
Mailbox indexing
This section launches the mailbox index consolidation operation: this completes the current indexing of the mailbox, indexing only the missing elements.
To launch the operation, click on the "Execute" button next to "Consolidate mailbox index".
Mobile devices
This section lets you manage the user's mobile devices: synchronization authorizations, information on devices known to the system, synchronization reset, remote wiping.

- Partnership: this box is used to suspend or enable a device's syncing without removing it altogether.
- Identity: shows the serial number the device signed in under
- Type: device brand/OS
- Last Sync: date and time of the device's latest sync with the server
- Reset sync: resets the device's sync information. The next synchronization will be performed in the same way as an initial synchronization: the device will perform a complete synchronization as if it had never been known to the server.
- Actions in case of loss or theft of a device :
-
 Remote wipe :
⚠️ Irreversible operation
If the phone tries to re-synchronize with BlueMind, it will be deleted again.
- on Android : deletes the EAS account and all its data (messages, contacts, calendar).
For a device to be completely wiped remotely (accounts, photos, SMS, files, etc.), the EAS account must be created using the "Microsoft Exchange ActiveSync" account type. - on iOS : deletes all data on the phone, whether related to the BlueMind account or private (accounts, photos, SMS, files, etc.).
- on Android : deletes the EAS account and all its data (messages, contacts, calendar).
-
 Cancel device deletion: allows a deleted device to be synchronized again with BlueMind
 -
 Trash icon: removes a device from synced devices. When unknown smartphones are not authorized by default, deleting a smartphone from the list will block its synchronization with BlueMind.
-
For more information, refer to the Administrator Guide > EAS Server Configuration
Deleting users
Suspend
A user can be suspended: this allows you to deny access to BlueMind without deleting the user's data. He can then be reactivated, and his account restored to its previous status.
To suspend a user:
- go to the management record of the relevant user: Directories > Directory Entries > select the user.
- on the first tab ("General"), tick the box "Suspended" on the right side of the page then click on "Save" to apply the modification
Delete
To delete one or several users completely and permanently, go to the page Directories > Directory Browser.
In the list of users, tick the box at the beginning of the row corresponding to the users to be deleted and then click on the button "Delete". A deletion confirmation will be requested, once confirmed, the users and all their data will be permanently deleted.
A user can be restored in BlueMind by going back to a previous backup. Data modified since the last backup cannot be recovered (new messages, modified contacts, calendar events added/deleted/modified, invitations received, etc.).
See Backing up and Restoring Data for more information on the restore backup feature, which allows you to restore all or part of a user's data.
See also User Departure and Email Redirection
Secure authentication
Multi-factor authentication via OTP
OTP stands for "One Time Password". This is a randomly generated 6-digit number that strengthens authentication and complements the user's password.
This number is valid only once for 30 seconds, after which a new number is generated.
Multifactor authentication is currently only available for connections to BlueMind webmail, including on mobile devices, and does not apply to connections via a third-party mail client.
However, to secure the connection, it is possible to disable the IMAP connection via a third-party client.
Two-factor authentication can also be managed via the bm-cli tool, enabling batch activation or deactivation, or for superadministrator admin0.
theme.common.Pourinfo Enabling two-factor authentication from the command line.
Activate security
This security feature can be activated in the user's management file:
- go to the Maintenance tab
- check the "Force OTP" box
- Save to accept the change
The next time the user logs on, he or she will have to set up a secure connection using OTP.
As the server has a 5-minute cache, activation or deactivation may not be immediate and may take some time before being visible to the user.
theme.common.Pourinfo Securing connection with OTP.
Manage identification keys
Identification keys are administered from the user's Maintenance tab: the "User credentials" section lists the keys set up by the user, using the device name they indicated when they were created:

To delete a user-set identification key:
- go to the Maintenance tab
- go to "User credentials" section
- click the trash icon corresponding to the key you wish to delete
- confirm to proceed
💡 Deletion is immediate, there is no need to click "Save"
As with activation, this will have the effect of prompting the user to set up a secure connection.
To force a user to reset his credential, simply delete it.
Password security add-on
For added password security, you can install the "Password SizeStrength" add-on to define strict password validity rules.
Installation
The plugin is simply installed by installing 2 packages on the command line, logged in as root on the:
aptitude install bm-plugin-core-password-sizestrength bm-plugin-admin-console-password-sizestrength
To complete installation, you must restart BlueMind:
bmctl restart
Configuration
Password policies are configured in the admin console > System Configuration > Password policy tab.
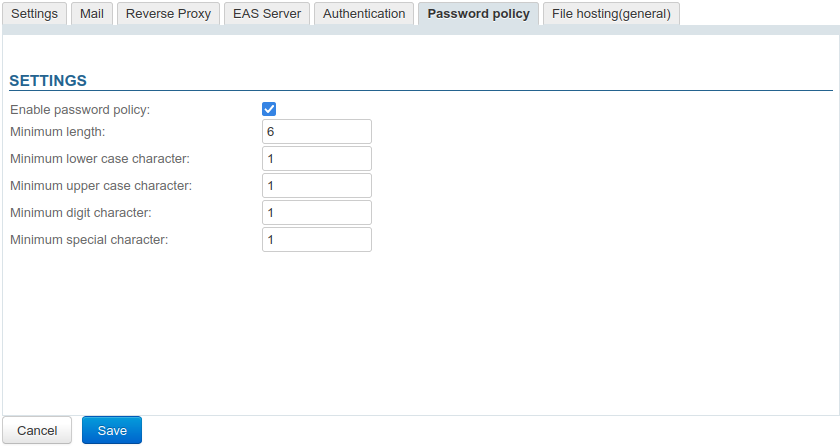
For earlier BlueMind versions, please refer to BlueMind 4 Documentation.
The changes are effective immediately – no restart required.
Changes are not retroactive and only apply to future password changes – users whose current password does not meet newly set rules will not be asked to change it and it will continue to work.
If the rules are not respected when a user tries to change his or her password, the user is informed and the password is not changed:

These rules do not apply to administrators (global administrator admin0 or domain administrators) whose choice of password continues to be free. In addition, the rules do not apply when changing a user's password from the administration console.