Setting up SSO Kerberos
This article describes how to enable BlueMind to recognize Kerberos authentication in a Windows infrastructure.
How Kerberos authentication works
Kerberos' authentication enables users with a Windows account already associated with their BlueMind account (via an AD import) to authenticate automatically, without having to go through a login screen (SSO).
To do this, the user must:
-
You must be logged into a Windows session on the domain for which Kerberos SSO has been enabled
Multi-domain installation
In the case of Multi-domain messaging, each domain can have its own Kerberos configuration.
If Kerberos is configured across multiple domains, each domain must have its own URL
If Kerberos is configured on a single domain, use the global URL -
Use a browser where SPNEGO is enabled for the BlueMind global URL
Authentication with Kerberos must be performed using the user's login in the format login@domain.tld; you cannot use one of the email addresses.
Kerberos configuration
In the rest of this documentation, we will consider the following elements:
-
BlueMind external URL (global URL):
bluemind.domain.tld -
Active Directory server (IP address or name of the Windows domain’s AD server):
ad.domain.tld -
Active Directory domain (or realm; corresponds to the Windows domain in uppercase):
DOMAIN.TLD⚠️ Add the AD domain to the BM domain aliases if it differs from the BM domain name.
All Kerberos configuration is done with the global URL. Do not use the URL of the domain concerned, either to generate the keytab file (and setspn), or for client configuration, even when Kerberos is configured on several domains.
Consequently, if the global URL is changed (see External URLs), all keytabs (and setspn) must be regenerated, and all clients must be reconfigured with the new global URL.
Keytab file generation
The keytab file is generated in 2 stages.
Open a cmd.exe console, then :
-
Create a user dedicated to Kerberos authentication in ActiveDirectory
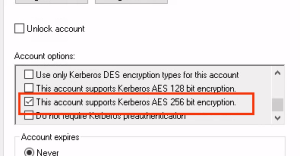
- Enable the "This account supports Kerberos AES 256 bit encryption" option in the "Account" tab:
- Add the role to the user by running the following command:
where username =bmkrb; password =krbpwd.
setspn -A HTTP/bluemind.domain.tld bmkrbThe command should return a result equivalent to the following rows:
Registering ServicePrincipalNames for CN=bmkrb,CN=Users,DC=domain,DC=tldHTTP/bluemind.domain.tldUpdated object - Enable the "This account supports Kerberos AES 256 bit encryption" option in the "Account" tab:
-
Create the keytab file with the following command:
- Windows 2012R2
- Windows 2016 and later
ktpass /out C:\bluemind.keytab
/mapuser bmkrb@DOMAIN.TLD

/princ HTTP/bluemind.domain.tld@DOMAIN.TLD

/pass krbpwd
/kvno 0
/# optional parameter, see the "Key Version Number" note below
/ptype KRB5_NT_PRINCIPAL
ktpass /out C:\bluemind.keytab /crypto AES256-SHA1 /mapuser bmkrb@DOMAIN.TLD
/princ HTTP/bluemind.domain.tld@DOMAIN.TLD
/pass krbpwd /kvno 0 /# optional parameter, see the "Key Version Number" note below /ptype KRB5_NT_PRINCIPALThe result should look like the following rows:
Targeting domain controller: AD.domain.tldUsing legacy password setting methodSuccessfully mapped HTTP/bluemind.domain.tld to bmkrb.Output keytab to C:\bluemind.keytab
The Kvno (Key Version Number) parameter is used to manage multiple keys for a user.
The value of the ktpass command (/kvno 0) given in the examples above is a generic value, which will work in most cases. However, this value can be blocking depending on the users and any keys already present or in use. Only the AD administrator knows exactly what this information is.
It is possible not to specify this parameter. In this case, a new key will be created automatically with the version number following the one already present in the AD for this account.
For more information on the Kvno parameter, see the Microsoft documentation on the ktpass command: https://learn.microsoft.com/en-us/windows-server/administration/windows-commands/ktpass
Activation in the administration console
- In the administration console, go to System management > Supervised domains > choose domain > Security tab.
- Select the Kerberos authentication mode and fill in the associated form:
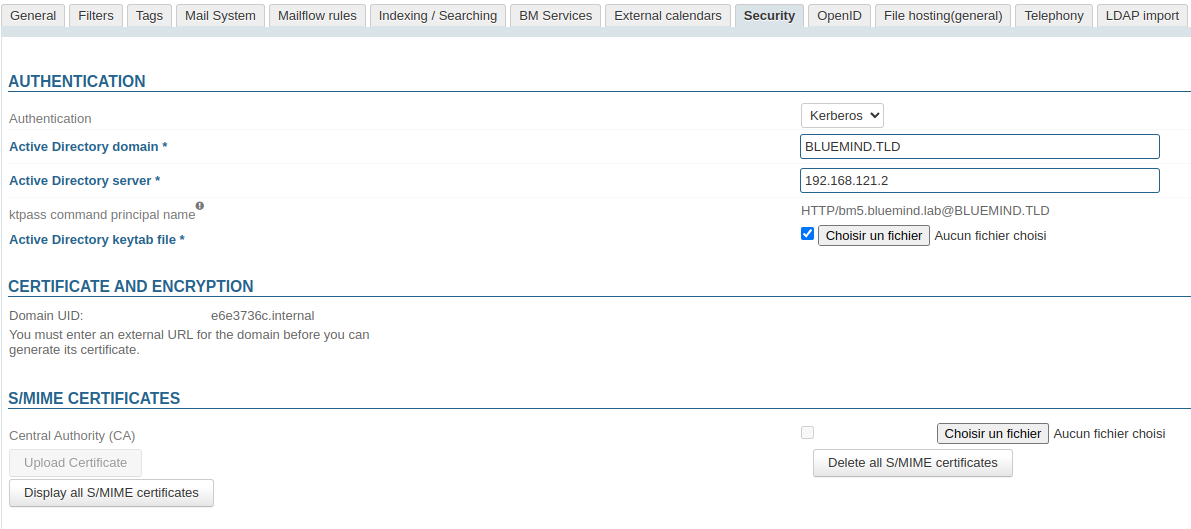
- Active Directory domain
- Active Directory server
- Active Directory keytab file: check the box and select the previously created file
- Click on "Save" to save your changes.
Configuring the Trusted Site
Your operating system or browser may consider the BlueMind domain to be untrusted. You must then add the BlueMind access URL as a trusted site.
Windows 10
- Open Internet Settings
- Search for "Internet Options" in the Start menu
- Go to the "Security" tab
- Add the site to your trusted sites
- Select the "Trusted Sites" option
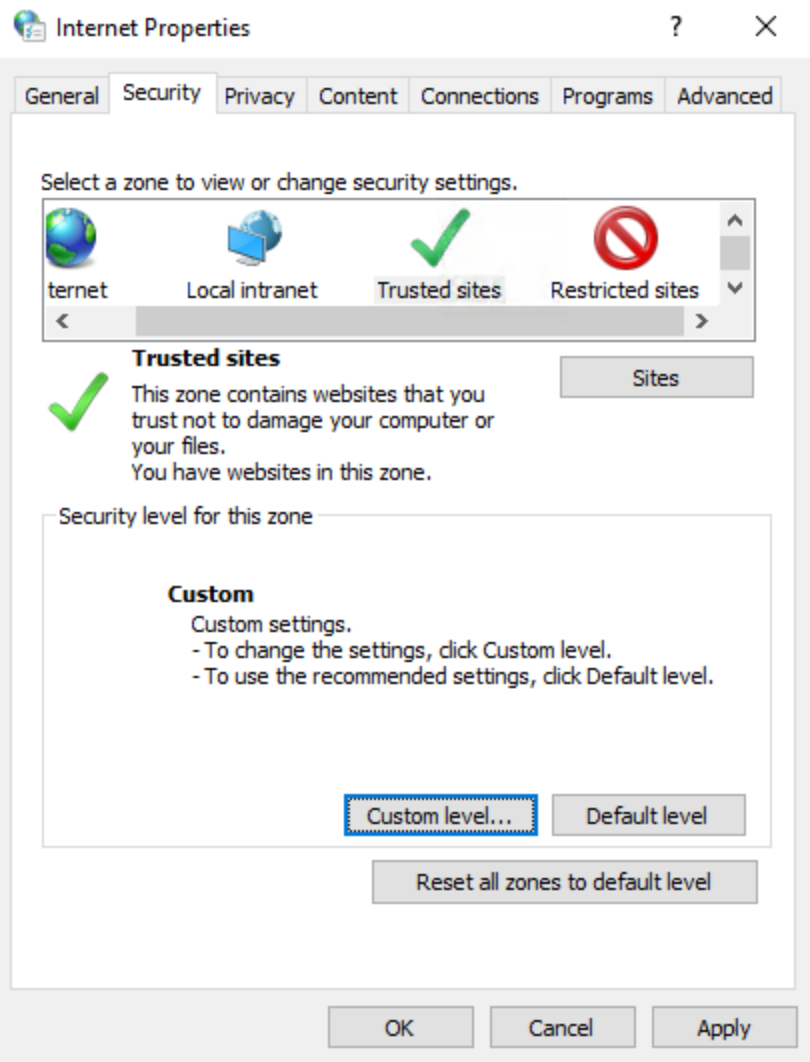
- Click on "Sites"
- In the pop-up window, enter the URL of the site, here
https://bluemind.domain.tld
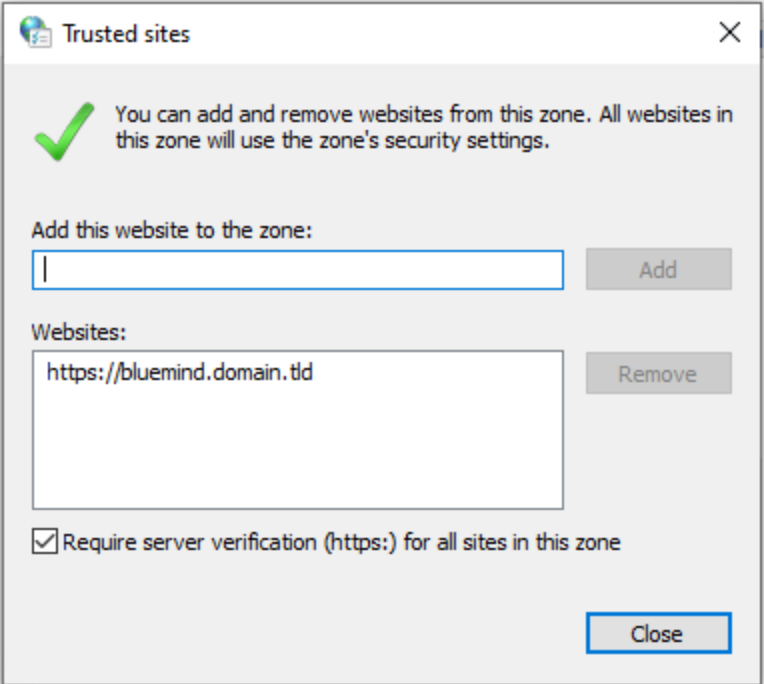
- Click "Add" and then "Close"
- Select the "Trusted Sites" option
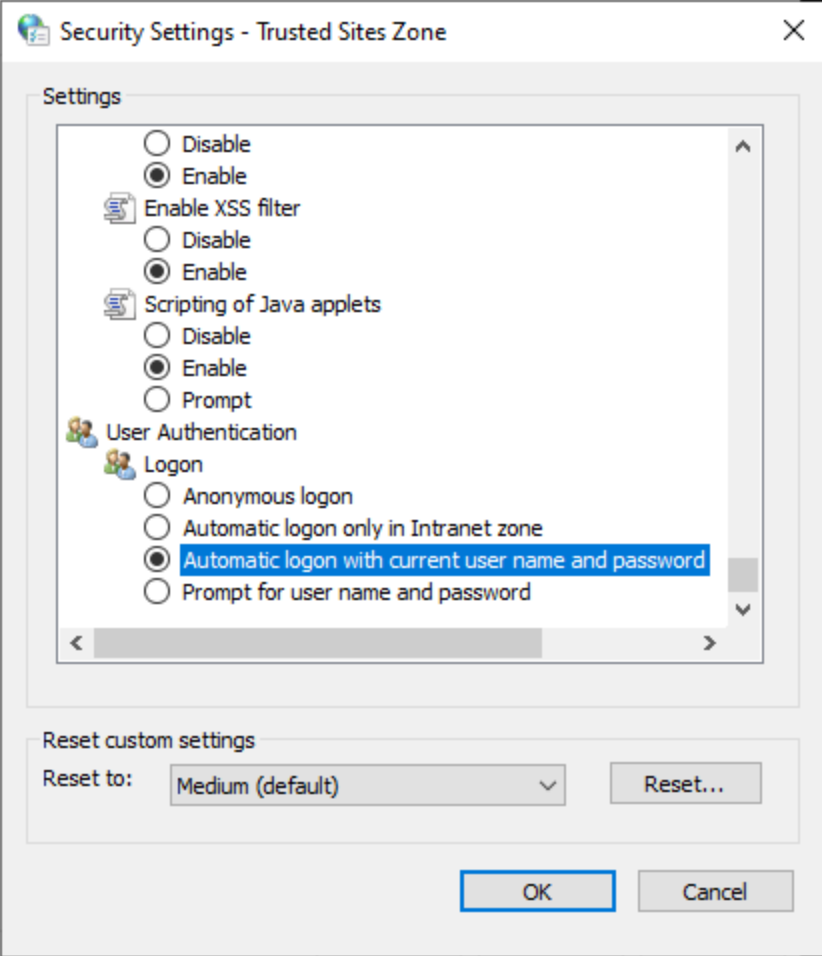
- Set the security level
- Click "Customize level..." in the "Security" tab
- In the list, go to "User Authentication" and check "Automatic logon with current username and password"
- Click "OK"
Firefox
Manual configuration
To add a trusted site, you need to access the browser settings :
-
in the web browser address bar, type:
about:config -
Validate the warning by clicking on "Accept the risk and continue".
-
In the search box, type:
trusted -
Double-click on the
network.negotiate-auth.trusted-urisparameter or click on the pencil at the end of the line to edit it. -
Enter the BlueMind domain address (here
bluemind.domain.tld) and confirm.
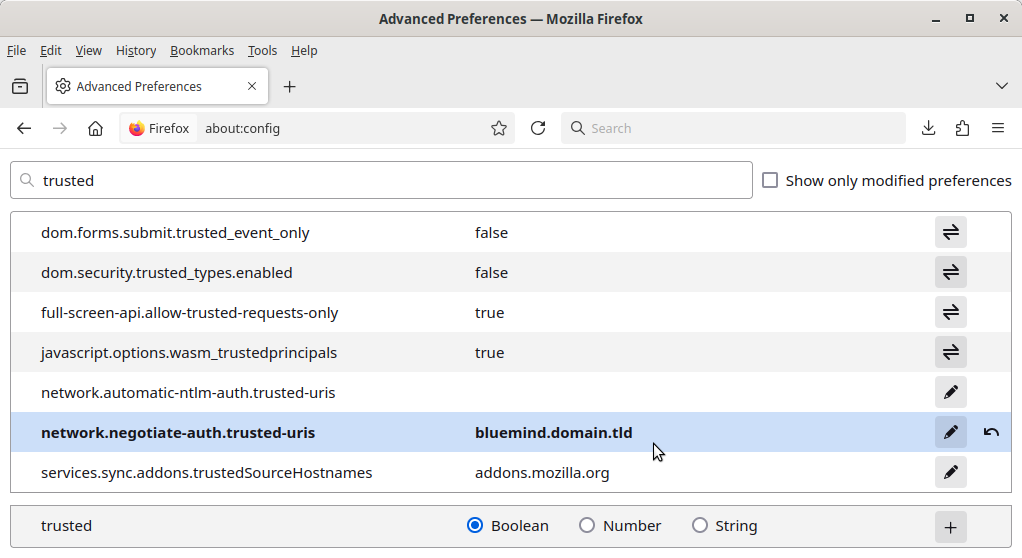
💡 The parameter appears in bold: this means that it has been modified, and no longer has its default value.
-
Restart Firefox for the change to take effect.
GPO configuration
Here is an example of how to configure GPOs for Firefox :
-
Add "Windows policies" to the AD server
-
Download the ADMX templates here: https://github.com/mozilla/policy-templates/releases
-
Place them in
\Windows\PolicyDefinitions💡 The
.admxfiles are in the root directory and the.admlfiles in the corresponding language folders.
-
-
Set up the Kerberos-specific GPO
-
Go to : Computer configuration > Policies > Administrative templates > Mozilla > Firefox > Authentication
-
Find and open the "SPNEGO" parameter
-
Press "Activate"
-
In the "Options" field, press "Display" and enter the address of the desired network resource
ℹ️ If several addresses are to be entered, enter one address per row.
-
Press the "OK" button to close the windows with the changes applied
-
For more information on GPO configuration, please refer to the following documentation:
- https://gpsearch.azurewebsites.net
- https://learn.microsoft.com/en-us/windows-server/identity/ad-ds/manage/group-policy/group-policy-management-console
As well as Firefox documentation:
Microsoft Edge
Manual configuration
Microsoft Edge is configured manually on the workstation:
- Run Regedit as administrator
- Go to
HKEY_LOCAL_MACHINE\SOFTWARE\Policies\Microsoft\Edgeand create the missing registry keys if necessary. - Create a value of type "String value (REG_SZ)", with name
AuthServerAllowlistand valuebluemind.domain.tld. - Restart Edge for the change to take effect.
In the event of a malfunction, ensure that the policy is taken into account:
- Start Edge
- Enter
edge://policyin the URL field - Check that the
AuthServerAllowlistpolicy appears in the "Microsoft Edge Policies" section, with the value entered above. If not, click onRecharger les stratégies. If it still doesn't appear, check that you have modified the register as described above.
For more information on Edge strategies, see the Microsoft documentation :
GPO configuration
Here is an example of how to configure GPOs for Edge:
-
Add "Windows policies" to the AD server
-
Download the ADMX templates here: https://www.microsoft.com/fr-fr/edge/business/download?cs=4134690573&form=MA13FJ
-
Place them in
\Windows\PolicyDefinitions💡 The
.admxfiles are in the root directory and the.admlfiles in the corresponding language folders.
-
-
Set up the Kerberos-specific GPO
-
Go to : Computer configuration > Administrative templates > Microsoft Edge > HTTP authentication
-
Find and open the "Configure list of authorized authentication servers" parameter
-
Press "Activate"
-
In the "Options" field, enter the address of the desired network resource
ℹ️ If several addresses are to be entered, separate them with commas
-
Press the "OK" button to close the windows with the changes applied
-
For more information on GPO configuration, please refer to the following documentation:
- https://gpsearch.azurewebsites.net
- https://learn.microsoft.com/en-us/windows-server/identity/ad-ds/manage/group-policy/group-policy-management-console
Chrome
Manual configuration
Google Chrome is configured manually on the workstation:
- Run Regedit as administrator
- Go to
HKEY_LOCAL_MACHINE\SOFTWARE\Policies\Google\Chromeand create the missing keys if necessary. - Create a value of type "String value (REG_SZ)", with name
AuthServerAllowlistand valuebluemind.domain.tld. - Restart Chrome for the change to take effect.
In the event of a malfunction, ensure that the policy is taken into account:
- Start Chrome
- Enter
chrome://policyin the URL field - Check that the
AuthServerAllowlistpolicy appears in the "Chrome Policies" section, with the value entered above. If not, click onRecharger les stratégies. If it still doesn't appear, check that you have modified the register as described above.
For more information on Chrome strategies, see the Google documentation:
GPO configuration
Here is an example of how to configure GPOs for Chrome :
-
Add "Windows policies" to the AD server
-
Download the ADMX templates here: https://support.google.com/chrome/a/answer/187202?hl=fr#zippy=%2Cwindows
-
Place them in
\Windows\PolicyDefinitions💡 The
.admxfiles are in the root directory and the.admlfiles in the corresponding language folders.
-
-
Set up Kerberos-specific GPO
-
Go to : Computer configuration > Administrative templates > Google > Google Chrome > HTTP authentication
-
Find and open the "Authentication server authorization list" parameter
-
Press "Activate"
-
In the "Options" field, enter the address of the desired network resource
ℹ️ If several addresses are to be entered, separate them with commas
-
Press the "OK" button to close the windows with the changes applied
-
For more information on GPO configuration, please refer to the following documentation:
- https://gpsearch.azurewebsites.net
- https://learn.microsoft.com/en-us/windows-server/identity/ad-ds/manage/group-policy/group-policy-management-console