Users
Users are the individuals who log in to BlueMind. These users have access to the various BlueMind features depending on their profile.
Create a user
To create a new user:
-
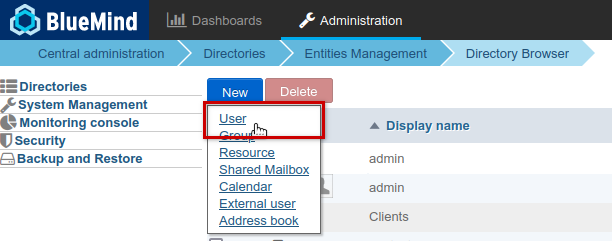
From the home page of the user management section Directories, click on ‘Create a user’ or, from the list of directory entries, use the New > User button:
-
Enter the new user's details in the popup window:
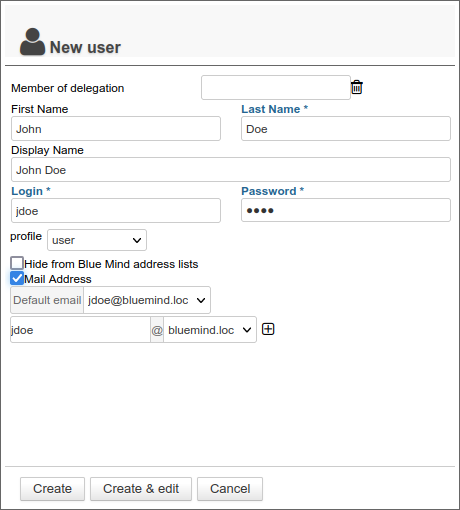
Full name
The full name is generated automatically as you type the first name and surname; it cannot be changed.
-
Select the default group:
userfor users,adminfor administrators, or a default group created by the administrator.For further information On the group management see page Editing Groups -
Check the desired options:
-
Hide BlueMind address lists: the user exists but is not visible in autocompletion (webmail dialer or calendar) or in the directory. Its address can still be used by administrators or those who know it.
-
E-mail address: the email account is activated and a default address based on the login is automatically created. To add aliases, click on
 at the end of the row.
If the installation includes several domain aliases, each additional address can be assigned to a specific domain or to all aliases.Maximum number of possible addresses
In BlueMind, you can create as many aliases as you wish, across as many domain aliases as you wish.
-
-
Click ‘Create’ to create a user quickly and easily, or click ‘Create & Edit’ to create the user and access the configuration options.
Quick creation
The “Create” button allows for quick creation using the information entered in the popup and the following default options:
- server localisation (time zone, time format, etc.)
- default storage server, with no disk space quota
- No automatic reply or email forwarding
- empty contact details
- The calendar is shared with the ‘Can invite me to a meeting’ option. This means that other users in the domain cannot view this user’s calendar but can still invite them to an event.
- The mailbox is not shared
The user can subsequently be edited via the administration interface.
Edit and manage a user
From the page Directories >> Directory Entries, select the user to edit from the list.
General
Account information
The ‘General’ tab displays the user’s key details: user account information, profile, group(s), location settings, etc.
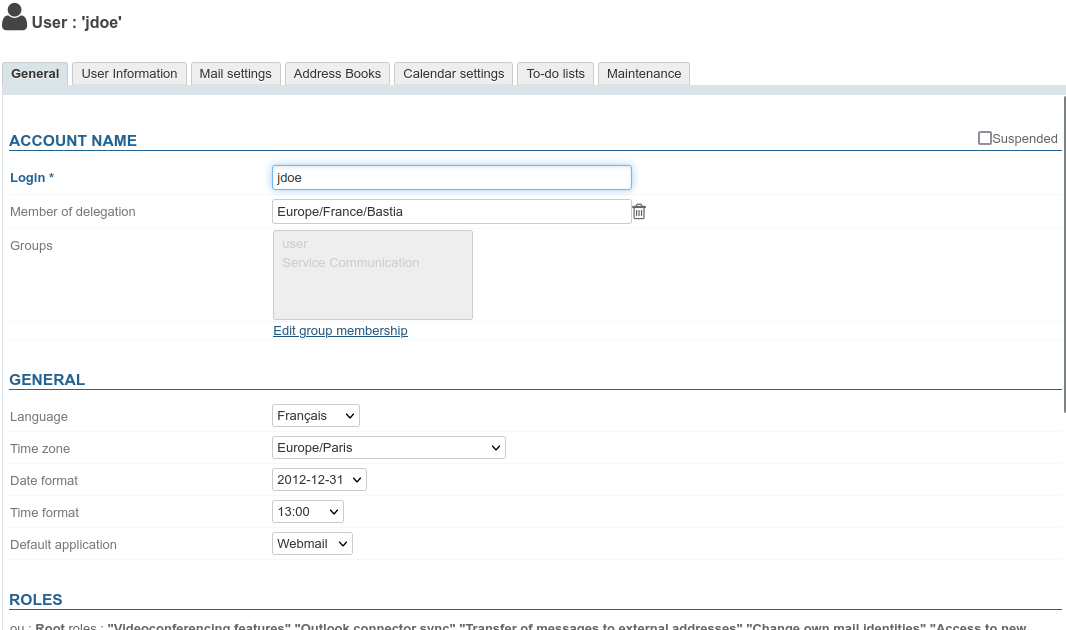
This tab allows you, amongst other things, to assign the user to one or more groups or a delegation, and to define the roles assigned to the user.
Changing the username
The account username can be changed on this page. Once the change has been saved, it takes effect immediately.
If the user whose username has been changed is working with Outlook connected via MAPI, they will need to create a new profile with the updated details.
The same applies to o365.
For further details, see the following page: https://learn.microsoft.com/fr-fr/microsoft-365/admin/add-users/change-a-user-name-and-email-address?view=o365-worldwide
Group membership
By clicking on the "Modify group membership" link, a popup window allows you to view and modify the groups to which the user belongs:
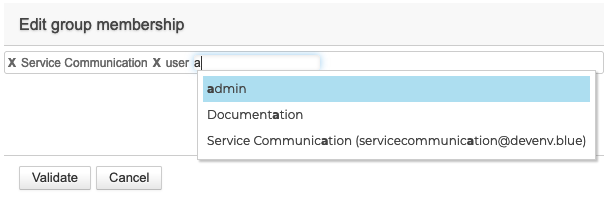
To delete a group, click on the corresponding cross; to add one, enter the first letters and validate a choice of those proposed by autocomplete.
Roles: administration rights and access to features
Here, you can customise, for each user, access to applications, specific features or administrative rights:
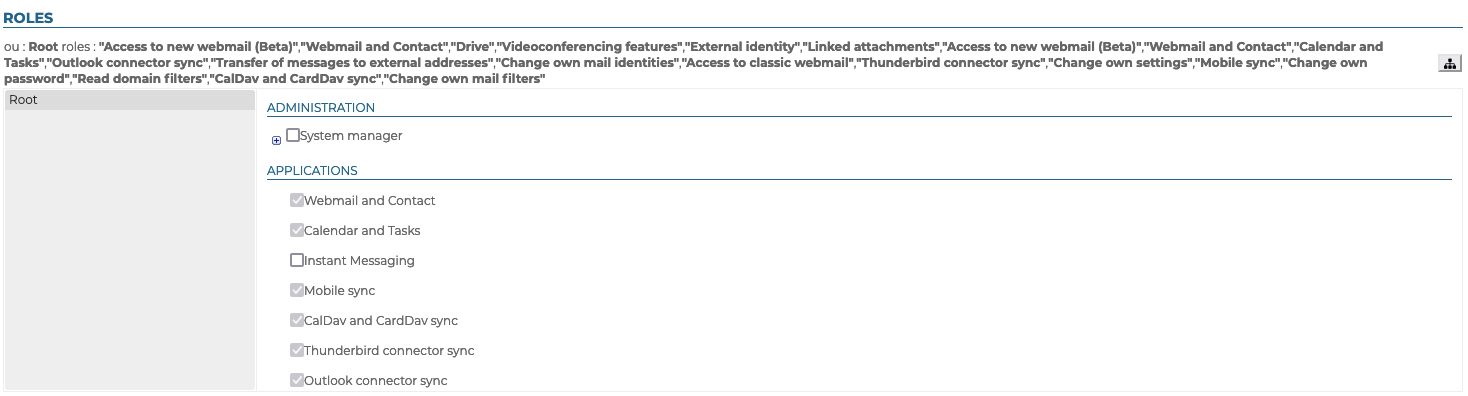
Assigned rights can only supplement the rights inherited from a group: rights assigned to a group of which the user is a member cannot be deselected on the user’s profile page.
Some applications may therefore appear ticked but greyed out and cannot be edited: this is because the user belongs to a group in which the application is enabled. In this case, you should therefore check the user’s group membership (see above)
For further details on roles, see the dedicated page ‘Roles: access and administration rights’ and the page on ‘Delegated administration’.
User information
The ‘User Information’ tab allows the administrator to add details to a user’s contact record.
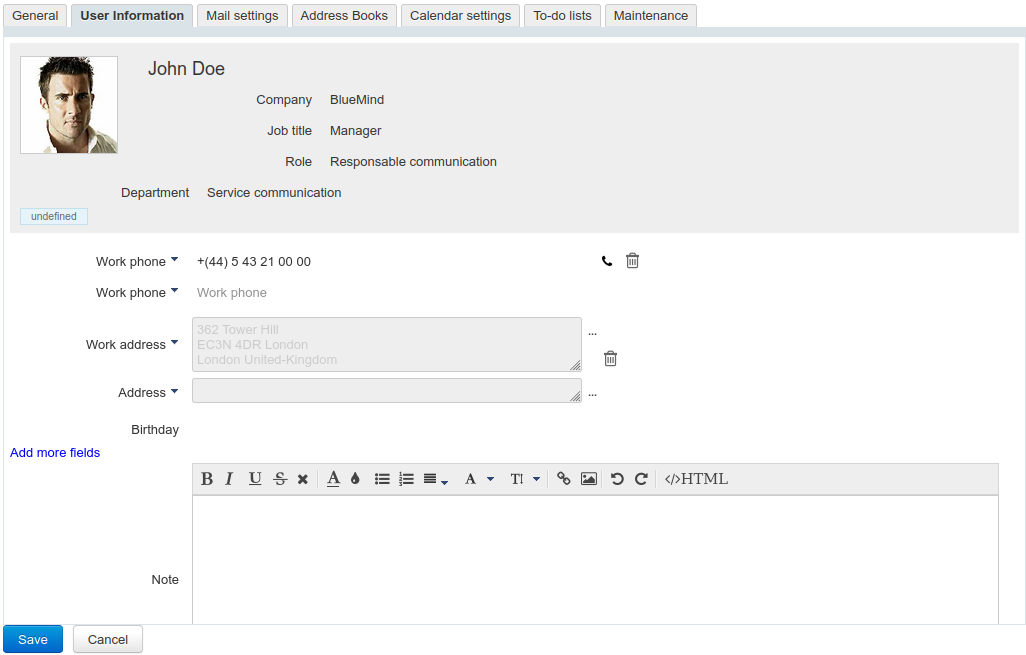
This tab shows the information that will be displayed on the directory entry for the user.
These data can also be used to implement Corporate Signatures.
Here, the administrator can enter information such as telephone numbers and postal addresses, or assign a photo to be used throughout BlueMind (contact sheet, event invitation, etc.).
Contact details belong to the BlueMind internal directory and can be accessed by all users of the solution. For this reason, only an administrator with the appropriate role can modify this information: users, even with full sharing right on the box, cannot modify it.
Mail
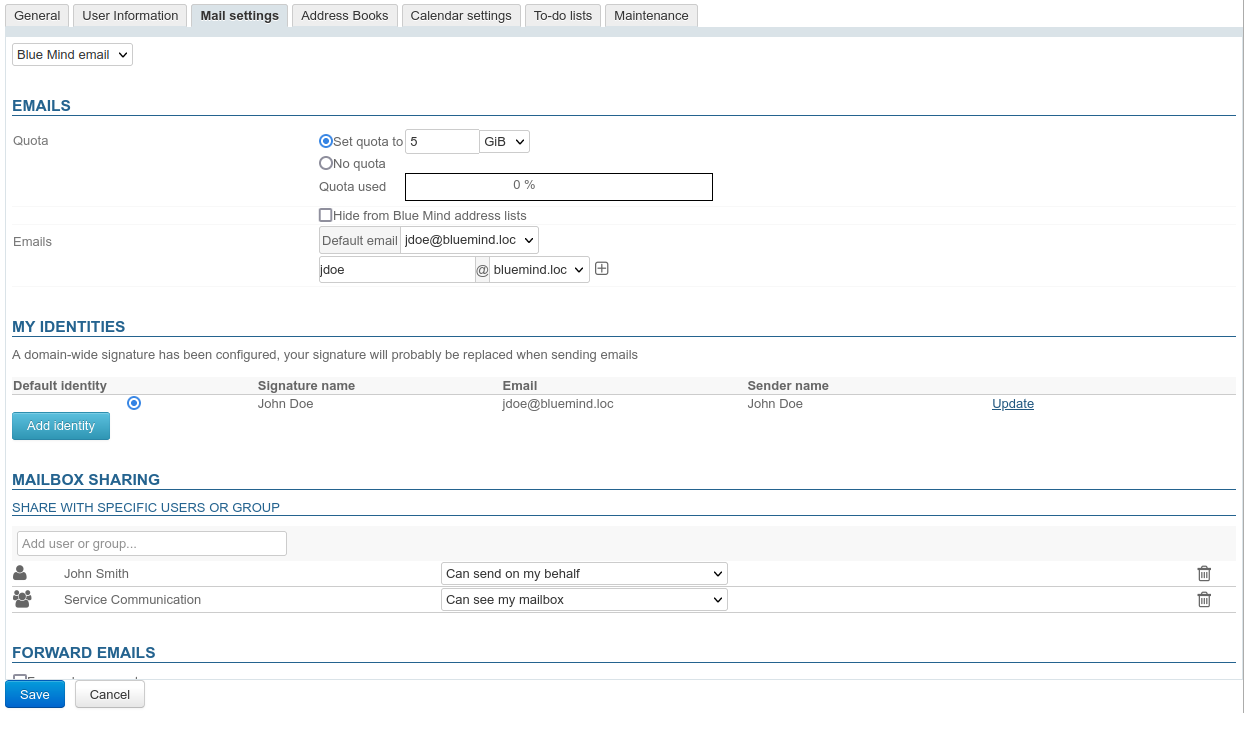
The ‘Email’ tab displays settings relating to the user’s mailbox (storage space, e-mail addresses, identities, sharing, etc.):
E-mail addresses
- Quota: the maximum size the mailbox can reach.
The space used is indicated by a progress bar. theme.common.Pourinfo, Managing storage capacity (quota). -
Hide BlueMind address lists: the mailbox exists but is not visible in autocompletion (webmail dialer or calendar) or in the directory. Its address can still be used by administrators or those who know it.
- Mail addresses and aliases: the user can have as many mail aliases as you like, on any or all of the available domain aliases.
Changing the default e-mail address
The default email address can be set to any of the email aliases. This address can be changed as often as required. Once the change has been saved, it takes effect immediately.
If the user whose default address has been changed is working with Outlook connected via MAPI, they will need to create a new profile with the updated details.
The same applies to o365.
For further details, see the following page: https://learn.microsoft.com/fr-fr/microsoft-365/admin/add-users/change-a-user-name-and-email-address?view=o365-worldwide
My identities
Identities allow users to send emails on behalf of one of their aliases or shared mailboxes, or to set up different signatures which they can choose depending on the emails they are writing.
For more information, see the relevant page in the user guide: Managing Account Identities.
Email sharing
This section allows you to manage the sharing and delegation options for the user’s mailbox:

Enter the desired user or group, then use the 2 drop-down lists to define :
-
The sharing right on the mailbox :
-
Peut lire ma messagerie : The designated user or group can view les emails.
-
Peut modifier ma messagerie : The designated user or group can add, delete, or move les emails et dossiers.
-
Peut modifier ma messagerie et gérer les partages: In addition to modification rights, the designated user or group can manage sharing rights de la messagerie.
-
Tous les droits sur ma messagerie: full sharing with complete delegation; the designated user or group has full rights to edit and share de la messagerie and can send emails using the "Send as" option.
ℹ️ When the sharing level "Tous les droits sur ma messagerie" is selected, the "Full delegation rights applied" level is automatically enabled and cannot be changed.
-
-
The right to delegate :
- No Delegation: The designated user or group cannot send emails using the shared mailbox's email address.
- Write as me (total impersonation): This is the highest level of delegation.
- Write from me: This is the default option for delegations.
theme.common.Pourinfo user guide pages :
Automatic message forwarding
Automatic email forwarding transfers all incoming emails to one or more mail addresses.
It is possible to specify several addresses to which emails can be forwarded.
Check the box to activate the transfer and enter a valid e-mail address:

Validate the autocomplete proposal, even if it is identical to the address entered. It is necessary that the blue cartouche with the deletion cross appears:

It is possible to add external addresses manually; these will not be added to the address book collected during transfers.
This type of transfer is subject to authorization by the administrators.
theme.common.Pourinfo : Mail roles.
Automatic reply
This section allows you to enable or disable the automatic responder for the user.
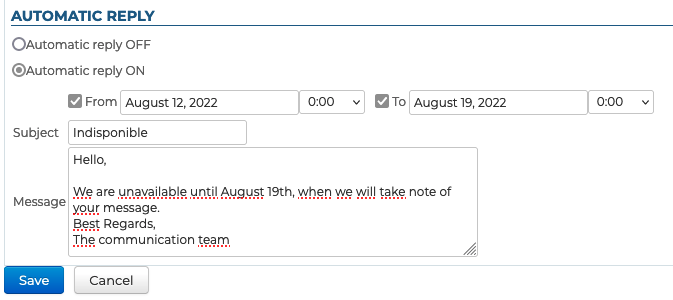
Complete the fields:
- Subject (mandatory): subject of the sent email
- Message (optional): message body
- Start and end dates (optional)
- if no start date is specified, auto-reply is enabled as soon as you save the new settings
- If no end date is specified, the voicemail system remains active until the out-of-office email is turned off
Then click on "Save".
When the automatic reply is turned off, the most recent settings are saved and will be restored when it is turned back on.
Once the auto-reply is enabled, when an email arrives in the mail app, an email is automatically sent to the sender, based on the time period and settings configured.
Just one away message is sent in reply to a single sender (email address) for every 3-day period.
If the user disables and then enables auto-reply again during that time without editing the subject or the message content, the senders who have already received an automatic reply will not receive a new one – the countdown for the period starts again where it was left off.
Example:
- User A activates their out-of-office reply
- They receive an email from User B on day D; an out-of-office email is sent, and the 3-day countdown begins
- The user deactivates their out-of-office reply on day D+1
- They receive a new email from B, no out-of-office email is sent
- the user reactivates their out-of-office reply with the same settings on day 2
- they then receive an email from B: the out-of-office reply system still considers it to be day 2, so no out-of-office email is sent.
Email filters
Filters allow you to apply sorting rules and actions to be carried out automatically to the user’s new messages.

For more information on configuring these filters, see the relevant page in the user guide: Applying sorting and action filters .
Address books
This tab lets you manage the user 's subscriptions to the address books available to it (its own address books or shared address books), as well as manage the sharing of its address books with other users or groups:
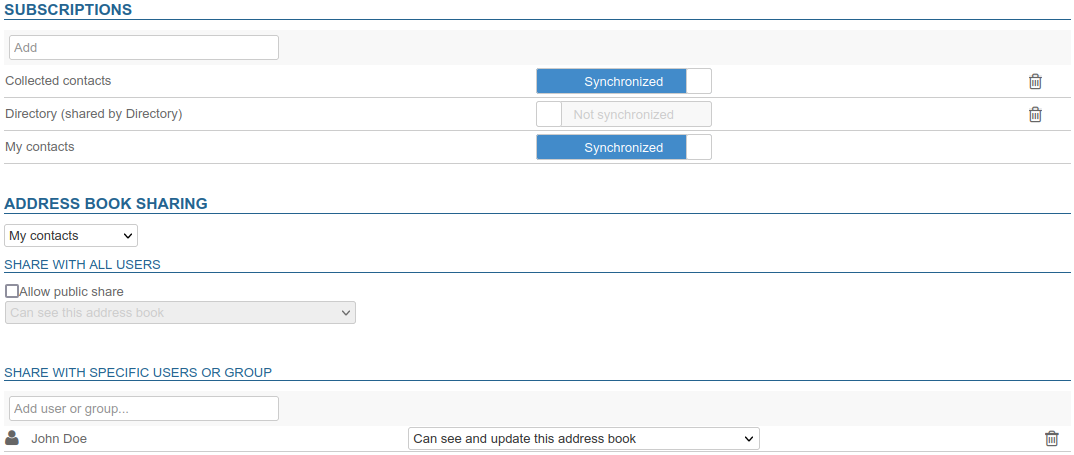
It is not possible for the administrator to create address books for the user, they can only be created from the preferences de celui-ci.
theme.common.Pourinfo Creating and Editing Address Books
theme.common.Pourinfo :
Calendar
The Calendar tab lets you :
-
access the calendar settings of the user (working days and hours, items displayed, default reminders, etc.):
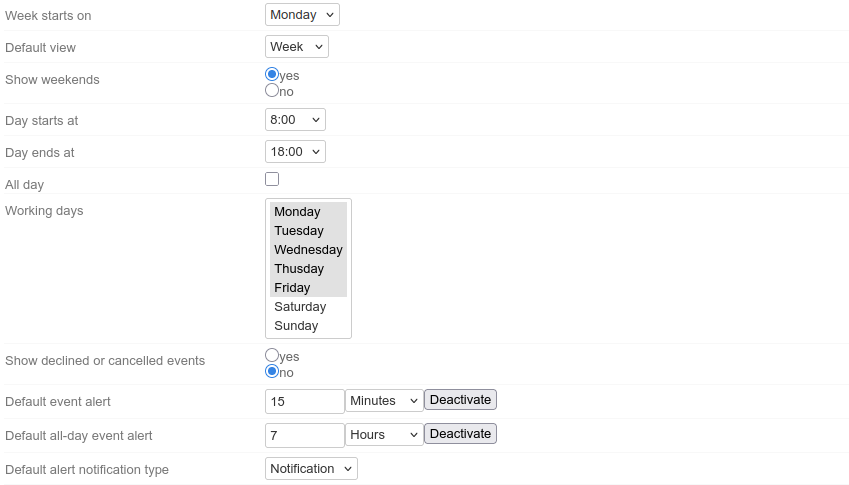
⇒ theme.common.Pourinfo Setting Calendar Preferences. -
to create additional calendars:
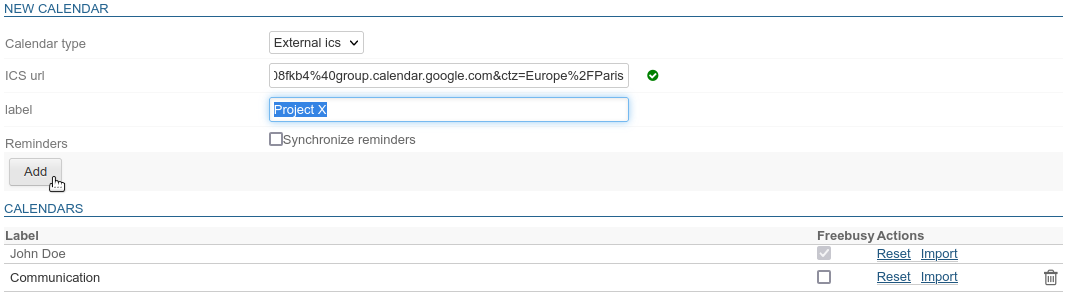
⇒ theme.common.Pourinfo Creating and Editing Calendars. -
Manage calendar sharing and availability:
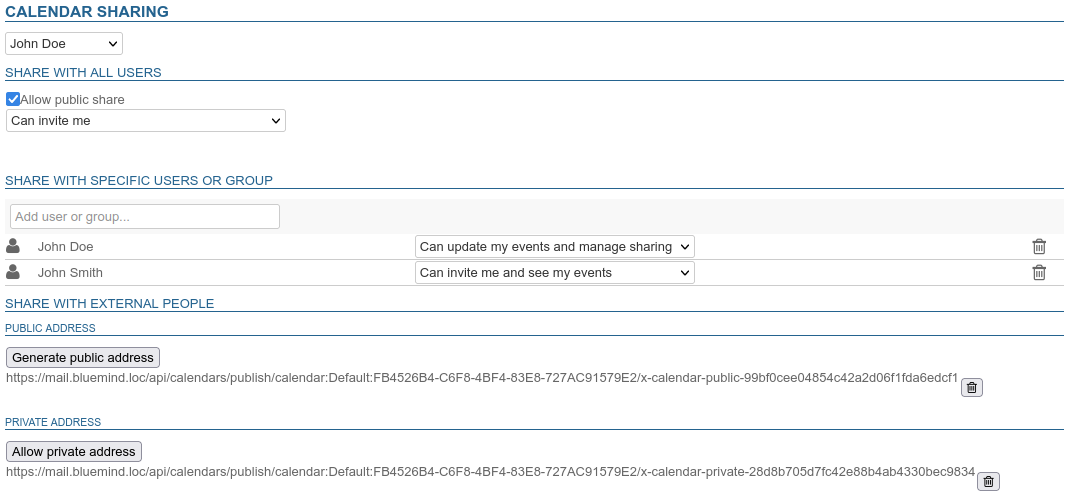
- internally: with all users or with specific users or groups
- externally: by generating a public or private address
⇒ theme.common.Pourinfo Sharing Calendars.
-
manage subscriptions to shared calendars (users or domains):

⇒ theme.common.Pourinfo Subscribing to a shared calendar.
To-do lists
This tab allows you to manage the sharing of the user's to-do lists and its subscriptions to the lists that are shared with it:
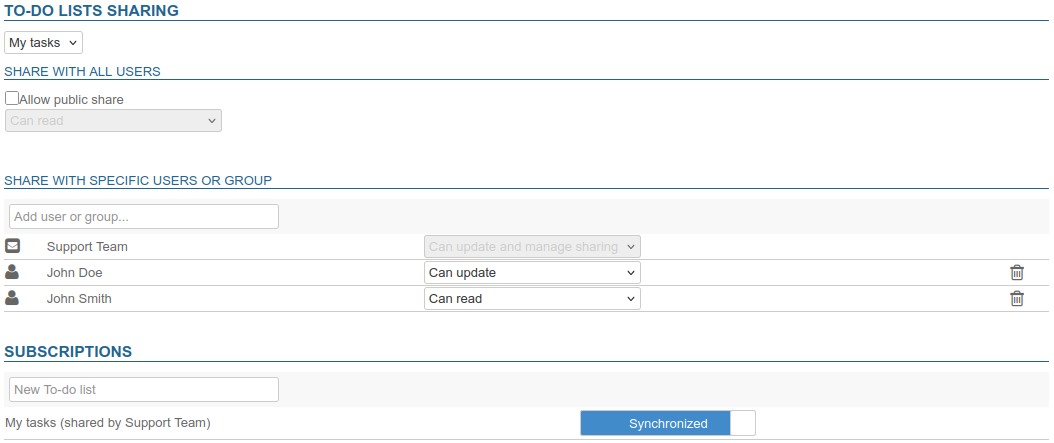
It is not possible for the administrator to create lists for the user, they are created exclusively from the de celui-ci.
theme.common.Pourinfo Creating and Editing Address Books
Related BlueMind documentation pages
Maintenance
This tab gives the administrator access to maintenance functions and the management of the user’s mobile devices:
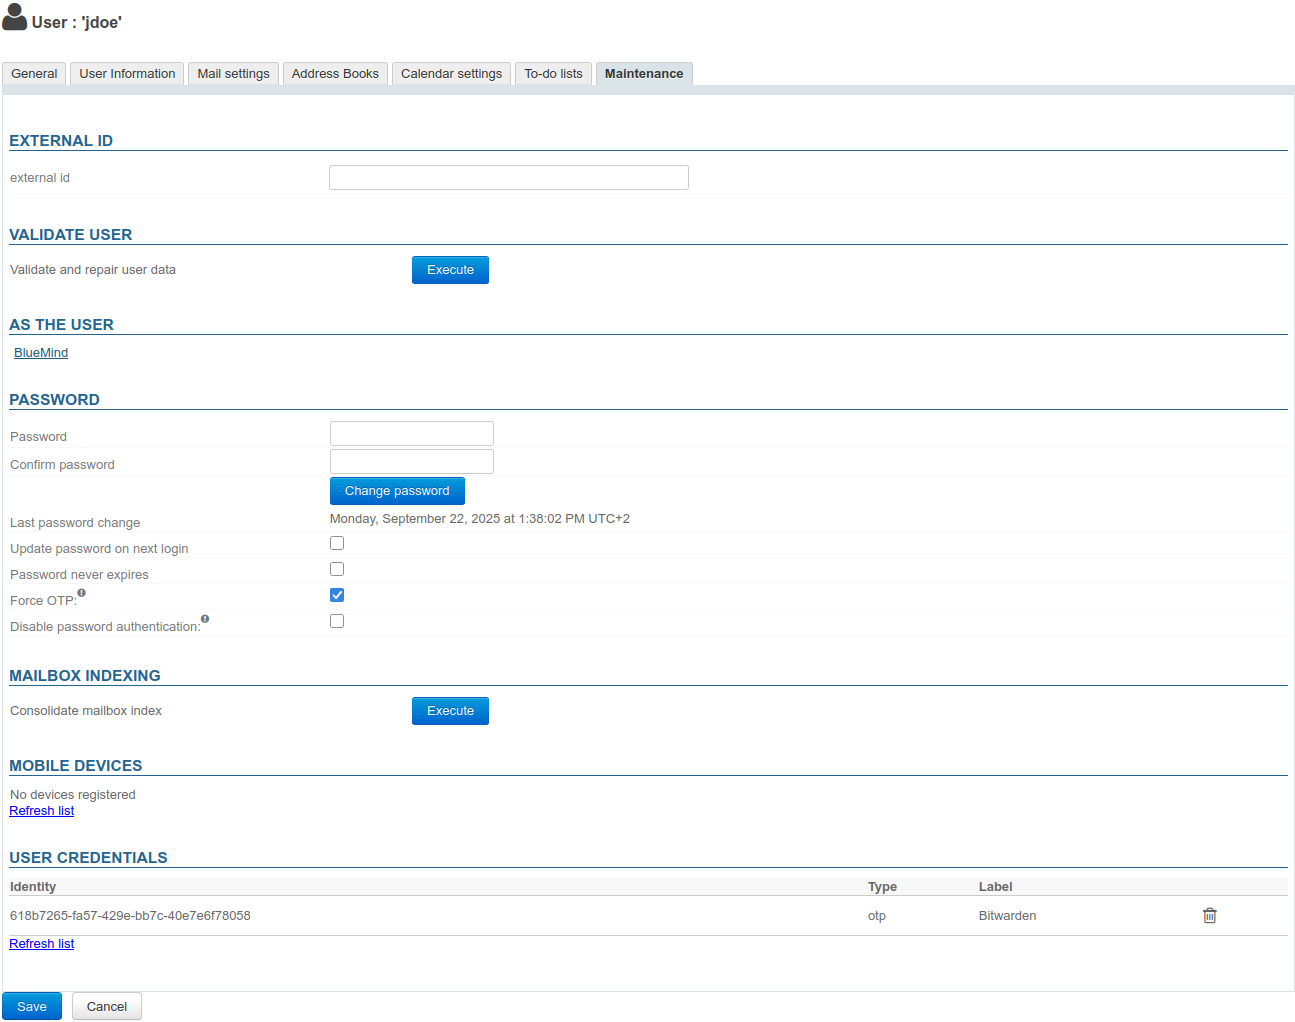
External ID
The field in this section is populated when the group is synchronized with an AD or LDAP account (theme.common.Pourinfo, LDAP Synchronization, and Active Directory Synchronization).
This field can be populated or modified to force or fix the UID of the corresponding user in the AD or LDAP directory.
Validate the user
The ‘Run’ button in this section allows you to run a ‘Validate and Repair’ operation on the user account. This comprises a set of operations that check and, if necessary, fix the integrity of the user and their data within the BlueMind system: checking the mailbox, calendar and address book containers, the folder hierarchy, subscriptions, mail filters, etc.
This operation corresponds to the bm-cli command:
bm-cli maintenance repair user@domain.net
theme.common.Pourinfo the page CLI Admin Client.
As the user
This section can be accessed via the super-administrator ‘admin0’ or another administrator with the ‘Sudo (privilege escalation)’ role. The link allows you to access the user’s BlueMind account, i.e. to log in to BlueMind on their behalf, without them having to provide their password.
Password
In this section, the administrator can change or reset a user’s BlueMind login password without needing to know their previous password. This section also shows the date on which the password was last changed (by the user or an administrator), if applicable.
The administrator has two additional options:
- Change password on next login: the user will be required to change their password the next time they log in (this does not log the user out if they are currently logged in).
- Password does not expire: this option allows you to exclude the user from the domain’s password expiry policy if this has been set up in the domain’s General configuration.
- Enforce OTP: the user will be required to set up authentication via OTP (« One Time Password »).
ℹ️ Due to the authentication cache, the implementation may not take effect immediately; the user may still be able to log in directly for a few minutes after the option has been enabled. theme.common.Pourinfo hereafter Multi-factor authentication via OTP.
- Disable password: the user will no longer be able to log in using a simple password from applications other than webmail (IMAP-connected thick client, EAS mobile app, etc.).
💡 This option provides enhanced security, particularly when OTP is enabled: if OTP is enabled, access to BlueMind without two-factor authentication is no longer possible.
To enable these options, tick the relevant box(es) and click the ‘Save’ button at the bottom of the page.
Mailbox indexing
This section allows you to run the user’s mailbox index consolidation operation: this operation completes the current indexing of the mailbox by indexing only the missing items.
To launch the operation, click on the "Execute" button next to "Consolidate mailbox index".
Mobile devices
This section allows you to manage the user’s mobile devices: synchronisation permissions, information on devices recognised by the system, resetting synchronisation, remote wipe.

- Partnership: this tick box allows you to suspend and resume synchronisation for a device without having to delete it completely
- Identity: indicates the serial number under which the device was registered
- Type: device brand/OS
- Last synchronisation: date and time of the device’s last synchronisation with the server
- Reset synchronisation: resets the device’s synchronisation information. The next synchronisation will take place in the same way as an initial synchronisation: the device will perform a full synchronisation as if it had never been recognised by the server.
- Operations in case of loss or theft of a device:
-
 Remote wipe:
⚠️ This operation cannot be undone
If the phone attempts to resynchronise with BlueMind, it will be wiped again.
- On Android: deletes the EAS account and all its data (emails, contacts, calendar).
In order for a device to be completely wiped remotely (accounts, photos, text messages, files, etc.), the EAS account must be set up using the ‘Microsoft Exchange ActiveSync’ account type. - On iOS: deletes all data on the phone, whether linked to the BlueMind account or of a private nature (accounts, photos, text messages, files, etc.).
- On Android: deletes the EAS account and all its data (emails, contacts, calendar).
-
 Cancel device wipe: allows a wiped device to synchronise with BlueMind again
 -
 Bin icon: allows you to remove synchronisation with a device. When unknown smartphones are not authorised by default, removing a smartphone from the list prevents that smartphone from synchronising with BlueMind.
-
For further information, see the administrator's guide > EAS Server Configuration
Delete a user
Suspend
A user can be suspended: this prevents them from accessing BlueMind without deleting their data. They can therefore be reactivated at a later date, at which point their user account will be restored to its previous state.
To suspend a user:
- Go to the relevant user’s management page: Directories > Directory Entries > select the user.
- On the first tab (“General”), tick the “Suspended” box on the right-hand side of the page, then click “Save” to apply the change
Delete
To permanently and completely delete one or more users from the system, go to the Directories > Directory Entries page.
In the list of users, tick the box at the start of the row corresponding to the users to be deleted, then click the ‘Delete’ button. You will be asked to confirm the deletion; once confirmed, the users and all their data will be permanently deleted.
It is possible to restore a user in BlueMind by restoring a previous backup. Data modified since the last backup cannot therefore be recovered (new messages, modified contacts, calendar events added/deleted/modified, invitations received, etc.).
Visit Backing up and Restoring Data for more information on the backup restoration feature, which allows you to restore all or part of a user’s data.
See also: User departure procedure and email redirection
Securing authentication
Multi-factor authentication via OTP
OTP stands for "One Time Password". This is a randomly generated 6-digit number that strengthens authentication and complements the user's password.
This number is valid only once for 30 seconds, after which a new number is generated.
Multi-factor authentication is currently only available when logging in to BlueMind webmail, including on mobile devices; it does not apply to logins via a third-party mail app.
However, to secure the connection, it is possible to disable IMAP access via a third-party client.
Two-factor authentication can also be managed via the bm-cli tool, allowing it to be enabled or disabled in batches or for the super-administrator ‘admin0’.
theme.common.Pourinfo Enabling two-factor authentication from the command line.
Enable security
This security feature can be enabled on the user management page:
- Go to the Maintenance tab
- Tick the “Force OTP” box
- Save to apply the changes
The next time the user logs in, they will be required to set up OTP authentication for their account.
As the server has a 5-minute cache, activation or deactivation may not take effect immediately and may require some time before it becomes visible to the user.
theme.common.Pourinfo Secure your connection with OTP.
Manage authentication keys
Identification keys are managed via the user’s Maintenance tab: the “User identification information” section lists the keys configured by the user, showing the device name they specified when creating them:

To delete an identification key set by a user:
- Go to the Maintenance tab
- Go to the “User Identification Details” section
- Click on the trash icon corresponding to the key you wish to delete
- confirm to proceed
💡 Deletion is immediate; there is no need to click ‘Save’
As with activation, this will prompt the user to configure their connection security.
To force a user to reset their key, simply delete it.
Password security add-on
To enhance user password security, you can install the ‘Password SizeStrength’ add-on to set strict password validity rules.
Installing
The add-on is easily installed by installing two packages via the command line, whilst logged in as root on the server:
aptitude install bm-plugin-core-password-sizestrength bm-plugin-admin-console-password-sizestrength
💡 Installation requires BlueMind to be restarted:
bmctl restart
Configuration
Configuration is carried out in the administration console > System Configuration > Password tab:
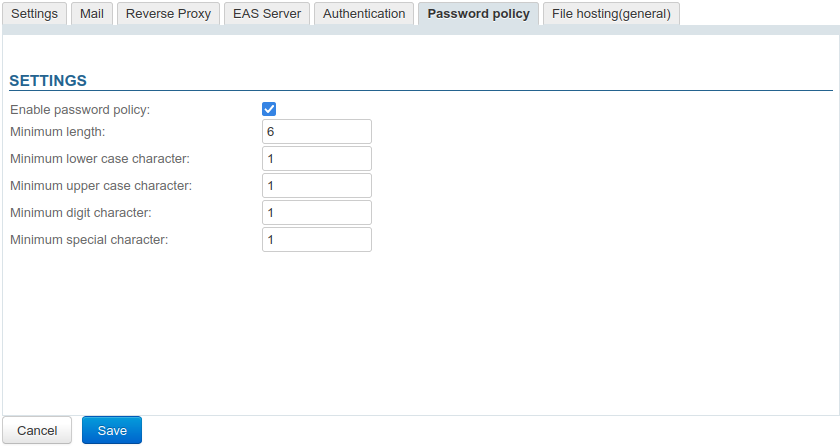
💡 Changes take effect immediately and do not require a restart.
Changes are not backdated and only apply to future password changes: users whose current password does not comply with the rules will not be asked to change it; it will remain valid.
If the rules are not followed when a user attempts to change their password, they are notified and their password is not changed:

Administrators (the global administrator ‘admin0’ or domain administrators) are not subject to these rules; they are free to choose their own password. Furthermore, the rules do not apply when changing a user’s password via the administration console.