Installing an Android VM
This page guides you through the installation of a virtual Android environment under Linux.
If you don't need Android Studio (the complete development environment), this procedure allows you to install only the bare essentials needed to launch an Android virtual machine.
All the information on command line tools is available here: https://developer.android.com/studio/command-line.
Prerequisites
Before installing the virtual machine itself, you need to set a number of environment variables and install the sdkmanager.
To do this:
-
Install the latest version of OpenJDK
-
Download the command line tool: https://developer.android.com/studio#command-tools-only
-
Create the directory tree that will host the SDK :
sudo mkdir -p /opt/android-sdk/cmdline-tools -
Uncompress the contents of the archive downloaded in step 2, and rename the
cmdline-toolsdirectory totools:unzip /path/to/commandlinetools-linux-*_latest.zip && mv cmdline-tools -
Move or copy this directory to the previously created directory:
sudo cp -r tools /opt/android-sdk/cmdline-tools -
Set environment variables in the user's shell profile file:
echo 'export ANDROID_SDK_ROOT="/opt/android-sdk"' >> ~/.profileecho 'PATH="$PATH:$ANDROID_SDK_ROOT/cmdline-tools/tools/bin:$ANDROID_SDK_ROOT/emulator"' >> ~/.profilesource ~/.profile -
Create the
android-sdkgroup, include the current user and assign rights to the folder:sudo groupadd android-sdksudo gpasswd -a $USER android-sdksudo setfacl -R -m g:android-sdk:rwx /opt/android-sdksudo setfacl -d -m g:android-sdk:rwX /opt/android-sdksudo chown -R :android-sdk /opt/android-sdksudo chmod u+w /opt/android-sdkConsideration
You need to log again or run
newgrp android-sdkfor the changes to take effect. -
Install SDK tools :
/opt/android-sdk/cmdline-tools/tools/bin/sdkmanager --sdk_root=/opt/android-sdk "tools"
You now have everything you need to use command line tools to manage your environment.
Android Virtual Device
Managing SDKs and tools
Prerequisites
-
check
PATHfor access to:$ echo $PATH | grep -i --color android/home/user/.local/bin:/usr/local/sbin:/usr/local/bin:/usr/sbin:/usr/bin:/sbin:/bin:/usr/games:/usr/local/games:/snap/bin:/snap/bin:/opt/android-sdk/cmdline-tools/tools/bin:/opt/android-sdk/emulator -
check
ANDROID_SDK_ROOT:$ echo $ANDROID_SDK_ROOT/opt/android-sdk -
check rights in installation folder:
$ ls -lg $ANDROID_SDK_ROOTdrwxrwxr-x+ 3 android-sdk 4096 Jul 29 15:30 cmdline-toolsdrwxrwxr-x+ 8 android-sdk 4096 Jul 29 15:48 emulatordrwxrwxr-x+ 2 android-sdk 4096 Jul 29 15:47 licensesdrwxrwxr-x+ 3 android-sdk 4096 Jul 29 15:47 platform-toolsdrwxrwxr-x+ 6 android-sdk 4096 Jul 29 15:48 tools
Commands
A few useful sdkmanager commands:
-
check what is installed:
$ sdkmanager --listInstalled packages:=====================] 100% Computing updates...Path | Version | Description | Location------- | ------- | ------- |emulator | 30.0.26 | Android Emulator | emulator/patcher;v4 | 1 | SDK Patch Applier v4 | patcher/v4/platform-tools | 30.0.4 | Android SDK Platform-Tools | platform-tools/ -
update SDKs:
$ sdkmanager --update
Managing AVDs
Before creating an AVD (Android Virtual Device), a system image must be installed in the environment.
To do this:
-
Install the necessary
platformsandplatform-toolscomponents:sdkmanager "platforms;android-33" "system-images;android-33;google_apis;x86_64"sdkmanager --install platform-tools -
Create the AVD according to the installed image:
avdmanager create avd -n avd-android33-pixel -k "system-images;android-33;google_apis;x86_64" --device "pixel" -
Finally, start AVD from command line using the name given in the creation command:
emulator -avd avd-android33-pixel
$ emulator -list-avds
avd-android30-pixel
avd-android33-pixel
Tips
Physical keyboard
To use your physical computer keyboard in the emulator, change the hw.keyboard variable value in the file ~/.android/avd/<your avd>/config.ini:
hw.keyboard = yes
Handling the emulator
You can send commands to the emulator to simulate specific activities: receive an SMS, change the GPS position, GSM power, etc.
The list of possible actions is available in the product documentation: https://developer.android.com/studio/run/emulator-console
Example for sending an SMS:
$ telnet localhost 5554

Trying ::1...
Connected to localhost.
Escape character is '^]'.
Android Console: Authentication required
Android Console: type 'auth <auth_token>' to authenticate
Android Console: you can find your <auth_token> in
'/home/user/.emulator_console_auth_token'
OK
auth FEHdxl/bQ4B24S2l
Android Console: type 'help' for a list of commands
OK
sms send 4085555555 hi there
OK
Opening a root shell
The root shell terminal differs from the shell adb terminal in the following ways:
- It creates a root shell that allows you to modify many parts of the system.
- It works even if the emulated system's adb demon is faulty.
- When you click Ctrl+C (⌘C), the emulator stops instead of the shell.
For more information, see https://developer.android.com/studio/run/emulator-commandline#advanced
Connect via ADB
adb devices
adb shell
emu64x:/ $ su
emu64x:/ # (you win!)
Screenshots

Known issues
sdkmanager error "Could not create settings"
Symptoms
Whatever the sdkmanager command, you get this response:
$ sdkmanager --list
Warning: Could not create settings
java.lang.IllegalArgumentException
    at com.android.sdklib.tool.sdkmanager.SdkManagerCliSettings.<init>(SdkManagerCliSettings.java:428)
    at com.android.sdklib.tool.sdkmanager.SdkManagerCliSettings.createSettings(SdkManagerCliSettings.java:152)
    at com.android.sdklib.tool.sdkmanager.SdkManagerCliSettings.createSettings(SdkManagerCliSettings.java:134)
    at com.android.sdklib.tool.sdkmanager.SdkManagerCli.main(SdkManagerCli.java:57)
    at com.android.sdklib.tool.sdkmanager.SdkManagerCli.main(SdkManagerCli.java:48)
Resolution
You need to help the java application find the root sdk.
To do this:
sdkmanager --sdk_root=/opt/android-sdk --list
Error "Warning: Failed to read or create install properties file."
Symptoms
Unable to write to the directory /opt/android-sdk.
Resolution
Access rights must be assigned to the user's group.
To do this:
$ sudo chmod g+w /opt/android-sdk
$ newgrp android-sdk
Error: some Android applications display a black or corrupted screen
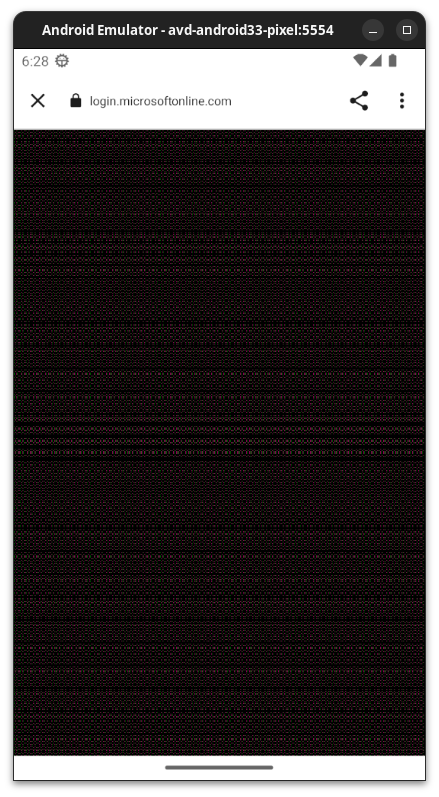
Symptoms
On a relatively recent machine, it's possible that Vulkan is being used and is not yet very stable. Some windows, such as Chrome, may appear with graphical errors or black screens of this type:
Resolution
You need to disable Vulkan in the emulator.
To do this:
-
Run the following command:
cat >> ~/.android/advancedFeatures.ini << EOFVulkan = offGLDirectMem = onEOF -
Relaunch emulator.
If visual errors are still present, the system may be using the experimental xe graphics driver for the graphics card. It is not yet stable either, so it may be necessary to disable it with the following command:
/sbin/lsmod | grep -wq ^xe && { echo "blacklist xe" | sudo tee /etc/modprobe.d/blacklist-experimental-xe-gpu.conf >/dev/null && echo "You need to reboot"; }
Then restart the machine.
Emulator error
Two binaries are available in the installation: /opt/android-sdk/tools/emulator and /opt/android-sdk/emulator/emulator.
Fewer issues occur with the version installed in /opt/android-sdk/emulator (cf. sdkmanager --list). However, depending on the variable $PATH, the other binary will be used (cf. which emulator).
If necessary, explicitly use /opt/android-sdk/emulator/emulator by modifying the PATH.