Setting up SSO Kerberos
This article describes how to enable BlueMind to recognize Kerberos authentication in a Windows infrastructure.
How Kerberos authentication works
Kerberos' authentication enables users with a Windows account already associated with their BlueMind account (via an AD import) to authenticate automatically, without having to go through a login screen (SSO).
To do this:
-
the user must be in a Windows session on the domain with which Kerberos SSO has been activated
Multi-domain installation
In the case of Multi-domain Messaging, each domain can have its own Kerberos configuration. If Kerberos is configured on several domains, each domain must have its own URL
If Kerberos is configured on 1 domain only, use the global URL -
the user must use a browser where SPNEGO is active for the BlueMind global URL
Kerberos configuration
In the rest of this documentation, we consider the following elements:
-
BlueMind's external URL (global URL):
bluemind.domain.tld -
Active Directory server (IP address or name of Windows domain AD server):
ad.domain.tld -
Active Directory domain (or realm, corresponds to the Windows domain in uppercase):
DOMAIN.TLD⚠️ Add the AD domain to the BM domain aliases if different from the BM domain name.
All Kerberos configuration is done with the global URL. Do not use the URL of the domain concerned, either to generate the keytab file (and setspn), or for client configuration, even when Kerberos is configured on several domains.
Consequently, if the global URL is modified (see External URL Configuration), all keytabs (and setspn) must be re-generated, and all clients reconfigured with the new global URL.
Keytab file generation
The keytab file is generated in 2 stages.
Open a cmd.exe console, then :
-
Create a user dedicated to Kerberos authentication in the ActiveDirectory by running the following command:
where user name =bmkrb; password =krbpwd.setspn -A HTTP/bluemind.domain.tld bmkrbThe command should return a result equivalent to the following rows:
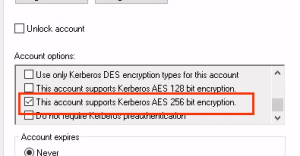
Registering ServicePrincipalNames for CN=bmkrb,CN=Users,DC=domain,DC=tldHTTP/bluemind.domain.tldUpdated objectℹ️ Option support AES
Check that the option "This account supports Kerberos AES 256 bit encryption" is enabled for the user account
-
Create the keytab file with the following command:
- Windows 2012R2
- Windows 2016 & +
ktpass /out C:\bluemind.keytab /mapuser bmkrb@DOMAIN.TLD
/princ HTTP/bluemind.domain.tld@DOMAIN.TLD
/pass krbpwd /kvno 0optional parameter, see "Key Version Number" note below
/ptype KRB5_NT_PRINCIPAL
ktpass /out C:\bluemind.keytab /crypto AES256-SHA1 /mapuser bmkrb@DOMAIN.TLD
/princ HTTP/bluemind.domain.tld@DOMAIN.TLD
/pass krbpwd /kvno 0optional parameter, see "Key Version Number" note below
/ptype KRB5_NT_PRINCIPAL
The result should look like the following rows:
Targeting domain controller: AD.domain.tldUsing legacy password setting methodSuccessfully mapped HTTP/bluemind.domain.tld to bmkrb.Output keytab to C:\bluemind.keytab
Activation in the administration console
- In the administration console, go to System management > Supervised domains > choose domain > Security tab.
- Sélectionner le mode d'authentification Kerberos et renseigner le formulaire associé :

- Domaine Active Directory
- Serveur Active Directory
- Active Directory keytab file: check the box and select the previously created file
- Click on "Save" to save your changes.
Client configuration
When the AD domain is different from the BlueMind domain, the client web browser may not trust the BlueMind domain. The BlueMind url access must therefore be added as a trusted site in the web browser.
Firefox
La configuration du site de confiance se fait dans la configuration des paramètres du navigateur :
-
in the web browser address bar, type:
about:config -
Valider l'avertissement en cliquant sur « Accepter le risque et poursuivre »
-
In the search box, type:
trusted -
Double-cliquer sur le paramètre
network.negotiate-auth.trusted-urisou cliquer sur le crayon en fin de ligne pour l'éditer -
Saisir l'adresse du domaine BlueMind (ici
bluemind.domain.tld) et valider.
💡 Le paramètre apparaît en gras : cela signifie qu'il s'agit d'un paramètre modifié, qu'il n'a plus sa valeur par défaut
-
Relancer Firefox pour que la modification soit prise en compte.
Microsoft Edge
Microsoft Edge is configured manually on the workstation:
- Run Regedit as administrator
- Go to
HKEY_LOCAL_MACHINE\SOFTWARE\Policies\Microsoft\Edgeand create the missing registry keys if necessary. - Create a value of type "String value (REG_SZ)", with name
AuthServerAllowlistand valuebluemind.domain.tld. - Restart Edge for the change to take effect.
In the event of a malfunction, ensure that the policy is taken into account:
- Start Edge
- Enter
edge://policyin the URL field - Check that the
AuthServerAllowlistpolicy appears in the "Microsoft Edge Policies" section, with the value entered above. If not, click onReload strategies. If it still doesn't appear, check that you have modified the register as described above.
For more information on Edge strategies, see the Microsoft documentation :
For more information on GPO configuration, please refer to the following documentation:
- https://gpsearch.azurewebsites.net
- https://learn.microsoft.com/en-us/windows-server/identity/ad-ds/manage/group-policy/group-policy-management-console
Chrome
Google Chrome is configured manually on the workstation:
- Run Regedit as administrator
- Go to
HKEY_LOCAL_MACHINE\SOFTWARE\Policies\Google\Chromeand create the missing keys if necessary. - Create a value of type "String value (REG_SZ)", with name
AuthServerAllowlistand valuebluemind.domain.tld. - Restart Chrome for the change to take effect.
In the event of a malfunction, ensure that the policy is taken into account:
- Start Chrome
- Enter
chrome://policyin the URL field - Check that the
AuthServerAllowlistpolicy appears in the "Chrome Policies" section, with the value entered above. If not, click onReload strategies. If it still doesn't appear, check that you have modified the register as described above.
For more information on Chrome strategies, see the Google documentation:
For more information on GPO configuration, please refer to the following documentation:
- https://gpsearch.azurewebsites.net
- https://learn.microsoft.com/en-us/windows-server/identity/ad-ds/manage/group-policy/group-policy-management-console