Adjusting your Account Settings
Each user can customize their BlueMind interface. They can in particular choose the language or even create delegations.
To do this, open preferences from the navigation bar at the top of all BlueMind pages:

Some modifications are automatically taken into account and saved on the fly, with an information banner appearing at the bottom of the page:

When user action is required, save and cancel buttons appear at the bottom of the page:

If the user clicks on the close cross to quit preference management, confirmation is requested if any changes have not been saved :

Setting general preferences
Setting the location
The Localization section lets you adjust the app's general localization and display settings:

-
The interface language
-
The date display format:
dd/mm/yyyyoryyyy/mm/ddormm/dd/yyyy -
The time display format: in 24-hour
13:00or in Anglo-Saxon format1:00 pm -
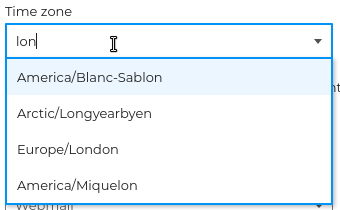
The time zone: select the text and erase it to see all available time zones, or type the first letters of the country or city to search for a time zone:
Consistency with the environment
When the chosen time zone is different from that of the system, a link makes it easy to bring it into line:
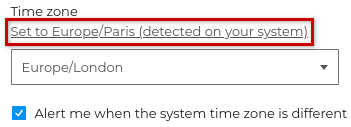
The " Alert me when system time zone differs " option lets you be notified when the chosen time zone differs from that of the workstation:

💡 Unchecking this option allows you to use a different time zone without being alerted every time you reconnect.
BlueMind is currently translated and being translated into several languages. The available languages and their evolution can be consulted on the site dedicated to the application's translation: https://forge.blue-mind.net/translate/
Setting the opening application
Also in general preferences, Default Application allows to choose the application that will open when connecting to BlueMind: Mail or Calendar.

Choosing theme
The theme allows you to display the mailbox in light mode or in dark mode. By checking the option System theme, the display adapts to the mode defined in the computer settings.

The dark theme is currently only available for the Mail application.
Creating tags
Tags are keywords that can be added to contacts or events to help organize and find them quickly.
Domain tags, created by the administrator, appear automatically :

To add a personal category, go to "+ Create a category" then
- enter a name
- choose a color (by default, an available color is suggested)
- click Create
Personal tags appear under "My tags" :

Click ![]() to edit and
to edit and ![]() to delete a tag.
to delete a tag.
Domain tags cannot be modified.
Managing security settings
The "Security" tab allows managing password and generate API keys :

Changing password
To change password :
- click on Edit to open the pop-up window:

- enter the new password in the "New password" and "Confirm new password" fields
- click Save
Generating an API key
API keys can be used to connect to a user account without using the account login password. In particular, they enable you to connect an external service without having to provide it with the user password, and to revoke access at any time by deleting the key.
To create a key :
- click on the + Generate API key button to open the pop-up window:

- enter a name to identify the use of the key (for example, the name of the service or site for which it will be used)
- click on "Create"
The key is immediately created and added to the user's key list. Each user can create as many keys as they wish.

Managing delegations
The Delegations tab allows the user to name delegates and define their rights level.

A delegate is a user in the domain that has the right to act on behalf of the delegator user. Depending on the options chosen, the delegate can :
- write on behalf of the delegating user
- write as the delegating user
- manage invitations of the delegator user
Note that delegations only concern the default mailbox and calendar (My mailbox, My calendar). It is not possible to create delegations for user-created e-mail addresses or secondary calendars.
To facilitate management of sharing default applications (My mailbox, My calendar, My contacts, My tasks), the user can also change access levels for each delegate from this tab.
Creating a delegation
To add a delegate :
- Click on "+ Create a delegation" to open the pop-up window
- Add a user in the "Delegate" field: type the first letters and choose from the list proposed by autocompletion.
- Set up the delegation by selecting the desired options and access rights levels to applications
- Click on "Create"

Setting up a delegation
1. Defining the delegation level
A delegation allows a delegated user to send emails using the delegating user's email address. The first parameter to set is the desired level of customization. Depending on the option selected, the recipient may or may not see that the email has been sent by a delegate.
⇒ Minimal option: The delegate can write from me
The "Written by me" option is checked automatically, is the minimum right to create a delegation**.
With this option, when the delegate sends a message with the delegating user's e-mail address, the recipient sees that the message has been sent by the delegate:

See the documentation Writing on behalf of another user for more details on using this option.
⇒ Maximum option: The delegate can write as me
The "Write as me" option completely impersonates the sent emails.
This option allows the delegate to send messages with the delegating user's e-mail address without the recipient seeing it:

See the documentation Write as another user for more details on using this option.
No messaging sharing level is required for a delegate to write on behalf or in the name of a delegator. However, it is advisable to give him at least read rights, so that he can see and reply to messages received by the delegator.
2. Giving invitation management rights
After selecting the delegation level, it is possible to allow the delegate to manage invitations received by the delegator from their Mail app.
To do this, select at least the "Can edit my appointments" Agenda sharing level and check the desired option(s):

⇒ Minimum option: The delegate receives my invitations and replies to them
For the delegate to manage invitations from their messaging, tick the option "Receives invitations-related messages and replies to them".
In addition to the default calendar writing rights - allowing to manage events from the Calendar - the delegate receives all notifications related to the delegator's public events in their mailbox and can reply to them, "on behalf of" or "as" the delegator - depending on the delegation option chosen.
This option does not require the delegate to have read rights to the delegator's mailbox.
See the documentation Delegate managing invitations for more details on using this option.
⇒ Maximum option: The delegate can see my private events
An additional right can be granted to the delegate to see and manage private events from the Calendar. To do this, also tick the option "Can view private events in the Calendar".
When this option is ticked, the delegate can see the details of the private event and can respond to the invitation in the Calendar.
Whatever the chosen delegation level, a delegate never receives notifications of private events in their mailbox. Managing private events by a delegate can only be done from the Calendar.
Refer to the documentation Responding to an event invitation for more information on managing events from the Calendar.
⇒ Additional setting: the delegator chooses whether or not to manage their invitations
As soon as at least one delegate is created with the "Receives and responds to invitation messages" option, an additional setting is displayed under the delegation summary table, allowing the delegate to choose whether or not he/she also wishes to manage his/her invitations:

- I do not receive messages: only the delegate receives the notification and manages the invitation, the delegator does not receive either the invitation or the responses sent by the delegate
- I receive a copy: both the delegate and the delegator receive the invitation, but only the delegate can manage the invitation; the delegator receives a read-only copy of the invitation and can see the delegate's response in the date icon:

- I also receive messages: the delegate and the delegator receive the invitation and can manage the invitation - this setting is selected by default
Refer to the documentation Managing invitations for more details on managing invitations from Messaging.
3. Managing access to my default applications
The delegation creation window also allows you to view and set default application sharing levels (My mailbox, My contacts, My calendar, My tasks) assigned to the delegate.
When a delegate is selected, the rights previously assigned in the sharing management of each application are automatically displayed.
If no rights have been defined, the default rights are :
- Calendar: "Can change my appointments
- Tasks: "Can modify my tasks".
- Mail: "Has no rights"
- Contacts : "Has no rights
When a right is modified here, the modification is immediately taken into account in the application's share management (refresh the page if necessary).
Once the delegation is created, the delegate receives an email notification summarizing the rights granted to them :

Managing delegations
Once delegations have been created, a table summarizes all the delegations and rights granted to each delegate :

- The icon
 indicates that the delegate can write on behalf of the delegator
 - The icon
 indicates that the delegate can receive invitations from the delegator and respond to them
 - The icon
 indicates that the delegate can see private events
Click on ![]() to modify a delegation and
to modify a delegation and ![]() to delete it.
to delete it.
Managing advanced settings
The + Advanced tab in the user account preferences provides access to resetting local data of the application as well as enabling notifications :

Managing local data
To purge local data and resynchronize, click on "Reset"
Enabling notifications
When notifications are enabled, an alert will be displayed on your screen when you get a new message or have an event reminder. To allow the browser to send these alerts, click on "Enable notifications".
The following browsers support this feature:
- Chrome
- Firefox
- Safari
The following browsers do not support this feature:
- Internet Explorer
- Opera
Downloading a connector
The Downloads section allows users to download the Thunderbird connector provided by BlueMind to synchronize their software.

For more information, consult the Thunderbird configuration 115 page.
Find out more
Watch related BlueMind videos
Adjusting preferences by application:
- Calendar:
- Mail:
- Contacts:
- Tasks :